

First, thank you so much for being here. It truly means the world when you stop by to try a new recipe, especially one as exciting and indulgent as this. Today, I’m sharing something that feels like the epitome of a summer treat—cool, creamy, caramelized, and absolutely addictive. These Biscoff Ice Cream Sandwiches are a dream come true for anyone who loves a frozen dessert that combines texture, flavor, and nostalgia with a modern twist. They’re made with no-churn vanilla ice cream, delicately swirled with melted Biscoff cookie butter, and nestled between two crispy, caramelized Biscoff cookies.
This recipe is as effortless as it is impressive. There’s no ice cream maker required, no baking involved, and no fancy tools needed. Just a little time, a few ingredients, and a lot of love for dessert. Whether you’re making them for a backyard BBQ, a casual party with friends, or just because you need a moment of sweet self-care, these sandwiches are here for you.
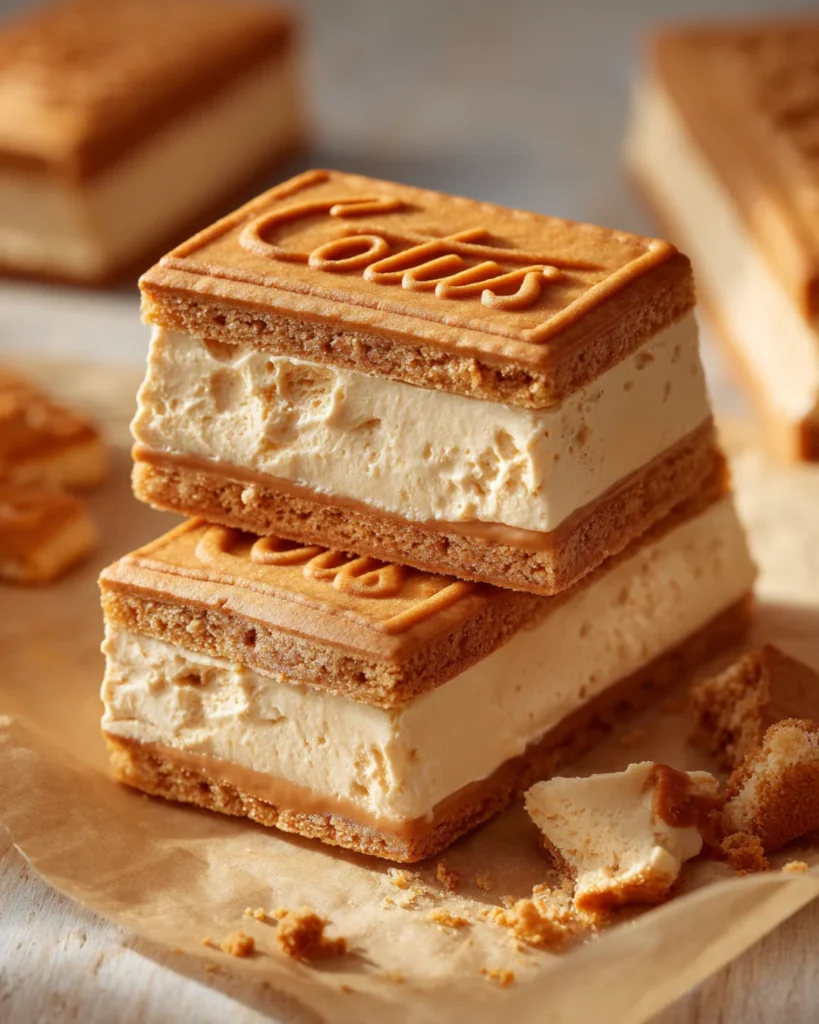
What Are Biscoff Ice Cream Sandwiches?
Biscoff Ice Cream Sandwiches are frozen cookie sandwiches made with a creamy, homemade no-churn vanilla ice cream base that’s swirled with rich Biscoff cookie butter. The ice cream is frozen in a loaf pan until firm, then scooped and pressed between pairs of crisp Biscoff cookies to create hand-held treats that are both nostalgic and elevated.
These sandwiches have that perfect bite: crunchy cookies that give way to soft, rich ice cream with beautiful caramelized cookie butter swirls throughout. They’re fun, fancy-feeling, and utterly crowd-pleasing.
Why You’ll Love This Recipe
- No-churn magic: No ice cream maker? No problem. This recipe uses a whipped cream and sweetened condensed milk base that yields an ultra-creamy texture without churning.
- Bold Biscoff flavor: Between the cookie butter swirl and the cookies themselves, the caramelized, spiced flavor of Biscoff shines through in every bite.
- Perfect make-ahead treat: These can be made days in advance and stored in the freezer until you’re ready to serve.
- Easily customizable: Add a splash of liqueur, roll the edges in cookie crumbs or chocolate chips, or try alternative cookie pairings.
- Kid-friendly or adults-only: Want a boozy version? Add a little Baileys or Kahlúa. Want a kid-friendly batch? Leave it out. Either way, you’re winning.
What Do They Taste Like?
The flavor of these ice cream sandwiches is indulgent and well-balanced. You get the cool creaminess of homemade vanilla ice cream, rich and velvety with a hint of sweetness from the condensed milk. Then comes the ribbon of Biscoff cookie butter, which adds depth with its warm cinnamon-caramel notes. The Biscoff cookies on either side add a crisp texture and that same distinctive spice, making each bite an explosion of flavor and contrast.
Benefits of This Recipe
Making Biscoff Ice Cream Sandwiches from scratch is a joy for several reasons:
- No oven needed, so it’s perfect for warm weather
- Minimal ingredients make it budget-friendly
- Easy steps and no special equipment ensure it’s beginner-friendly
- Stores well in the freezer, so you always have a treat on hand
- Flexible and creative, with lots of ways to customize the flavor
Ingredients (Makes 10 Sandwiches)
For the Ice Cream:
- 2 cups heavy whipping cream, cold
- 1 can (14 oz) sweetened condensed milk
- 1 teaspoon vanilla extract
- 1/3 cup Biscoff cookie butter, melted slightly
For Assembly:
- 20 Lotus Biscoff cookies (rectangular cookies work best)
- Optional: extra crushed Biscoff cookies for rolling edges
- Optional: 1–2 tablespoons Baileys or Kahlúa for a boozy twist
Tools You’ll Need
- Electric mixer or hand mixer
- Large mixing bowl
- Medium mixing bowl
- Rubber spatula
- Loaf pan or other freezer-safe container
- Knife or skewer for swirling
- Baking sheet
- Parchment paper
- Ice cream scoop or spoon
- Offset spatula (optional, for neat assembly)
Ingredient Substitutions and Variations
- Cookie Butter Alternatives: Can’t find Biscoff cookie butter? Use another spiced cookie spread or try peanut butter, Nutella, or almond butter.
- Boozy Add-ins: Add 1–2 tablespoons of Baileys, Kahlúa, or even dark rum for an adult twist.
- Dairy-Free Version: Use full-fat coconut milk and a dairy-free condensed milk substitute for the base. Whip coconut cream until fluffy for a similar effect.
- Gluten-Free: Replace Biscoff cookies with a gluten-free spiced cookie and opt for a gluten-free cookie spread.
- Add Crunch: Fold crushed cookies or chopped nuts into the ice cream base for extra texture.
How to Make Biscoff Ice Cream Sandwiches
Step 1: Whip the Cream
Using a cold mixing bowl and electric mixer, beat the heavy cream until stiff peaks form. This should take about 3 to 5 minutes on medium-high speed. The whipped cream should be thick and able to hold its shape when you lift the beaters.
Step 2: Combine Condensed Milk and Flavorings
In a separate medium bowl, mix the sweetened condensed milk with the vanilla extract and optional liqueur. Stir until smooth and well combined.
Step 3: Fold to Make the Ice Cream Base
Gently fold the whipped cream into the condensed milk mixture. Be careful not to deflate the whipped cream too much. Use a rubber spatula and sweep from the bottom of the bowl up and over until the mixture is fully incorporated and fluffy.
Step 4: Swirl in the Biscoff
Pour half of the ice cream base into a loaf pan or other freezer-safe container. Drizzle half of the melted Biscoff cookie butter over the top. Add the remaining ice cream mixture, then drizzle the remaining cookie butter. Use a butter knife or skewer to swirl it all together, creating pretty ribbons of cookie butter throughout.
Step 5: Freeze
Cover the loaf pan tightly with plastic wrap or a lid and freeze for at least 6 hours, or overnight, until the ice cream is firm.
Step 6: Assemble the Sandwiches
Once the ice cream is frozen, line a baking sheet with parchment paper. Match your cookies into similarly sized pairs. Let the ice cream sit out for a couple of minutes to soften slightly for easier scooping. Scoop a generous amount of ice cream and place it on one cookie. Top with the second cookie and gently press down to form a sandwich. Use a spatula to smooth the sides. For extra flair, roll the exposed ice cream edges in crushed Biscoff cookie crumbs.
Step 7: Refreeze Before Serving
Place all assembled sandwiches on the lined baking sheet and return to the freezer for at least 30 minutes to firm up. After that, they’re ready to serve or store.
Serving Suggestions
- Pair these sandwiches with iced coffee or cold brew for a café-style afternoon snack.
- Serve them alongside fresh strawberries, raspberries, or peach slices for a fruity contrast.
- Crumble over brownies or chocolate cake for a show-stopping dessert plate.
- For parties, cut them in half or quarters and serve on a chilled platter for easy finger food.
Want to go all-out? Try pairing them with some ultra-fun recipes like these Cheesy Onion Rings for a savory-sweet contrast, or serve them after a bold cocktail like Ballz on Fire for a spicy, adventurous evening treat. And if you’re into playful desserts, you absolutely have to check out these Rainbow Frosted Surprise Donuts, which would look amazing on a party dessert table next to your Biscoff Ice Cream Sandwiches.
Tips for the Best Ice Cream Sandwiches
- Use very cold cream and a chilled bowl for the fluffiest whipped cream.
- Don’t overmix once you add the whipped cream—gentle folding keeps it light.
- Swirl, don’t stir the Biscoff into the ice cream to maintain visual contrast and flavor pockets.
- Let the ice cream soften for just a minute before scooping—it makes sandwich assembly much smoother.
- Use a sharp serrated knife if slicing them into smaller pieces for sharing.
Storage Instructions
Place assembled ice cream sandwiches in an airtight container. You can stack them between sheets of parchment paper to prevent sticking. Store in the freezer for up to two weeks. For best texture, let them sit at room temperature for 1 to 2 minutes before eating.

Frequently Asked Questions
Can I make these without cookie butter?
You can, but the cookie butter is a huge part of what makes these sandwiches special. If you must substitute, try another spread like Nutella or almond butter for a different flavor profile.
Can I use store-bought ice cream instead of making my own?
Yes! Choose a high-quality vanilla ice cream, let it soften slightly, swirl in the melted cookie butter, and freeze again before assembling your sandwiches.
Are these sandwiches gluten-free?
Not as written. However, you can easily make them gluten-free by substituting the Biscoff cookies with gluten-free spiced cookies and using a cookie spread that’s certified gluten-free.
Can I make these in advance?
Yes, they store wonderfully in the freezer for up to two weeks. Just be sure to wrap them well or use an airtight container to prevent freezer burn.
What if I want to serve them at a party?
Make them smaller! Use half-scoops and mini cookies to make bite-sized versions that are perfect for dessert platters.
Conclusion
These Biscoff Ice Cream Sandwiches are a perfect representation of how simple ingredients can come together to make something truly magical. No baking, no fancy gear, just layers of flavor and texture that will make everyone smile. They’re great for family treats, casual parties, or even just a sweet moment for yourself on a hot day.
They’re a reminder that dessert doesn’t have to be complicated to be memorable. And honestly? I’m kicking myself for not having shot these sooner—because once you make them, they’re gone before you can say “cookie butter.”
More Frozen Treats You’ll Love
- Rainbow Frosted Surprise Donuts
- Cheesy Onion Rings (for a wild dessert-night pairing)
- Ballz on Fire Cocktail for an adults-only frozen dessert party
Share the Love
Tried this recipe? I’d be so grateful if you left a review or comment below—it really helps others find and enjoy these sweet treats. Don’t forget to pin it and share your creations on Pinterest. I love seeing your versions of these sandwiches!
Nutritional Information (Approximate Per Sandwich)
Calories: 340
Fat: 22g
Carbohydrates: 32g
Sugar: 20g
Protein: 4g

Biscoff Ice Cream Sandwiches: A No-Churn Frozen Delight That Screams Summer Fun
Description
Cool, creamy, and spiced just right, these Biscoff Ice Cream Sandwiches are made with a no-churn vanilla base swirled with cookie butter and layered between crisp caramelized Biscoff cookies. No ice cream maker needed, and they’re perfect for prepping ahead! Whether you’re making a batch for a backyard get-together or a quiet night in, these frozen treats are guaranteed to steal the show.
Ingredients
For the Ice Cream:
2 cups heavy whipping cream, cold
1 can (14 oz) sweetened condensed milk
1 teaspoon vanilla extract
1/3 cup Biscoff cookie butter, melted slightly
Optional: 1–2 tablespoons Baileys or Kahlúa (for an adults-only twist)
For Assembly:
20 Lotus Biscoff cookies (rectangular ones hold shape best)
Optional: Crushed Biscoff cookies for rolling the edges
Instructions
Whip the Cream: In a large mixing bowl, whip the cold heavy cream until stiff peaks form. This should take about 3–5 minutes with a hand or stand mixer.
Make the Base: In a separate bowl, stir together the sweetened condensed milk, vanilla extract, and (if using) Baileys or Kahlúa until smooth.
Combine: Gently fold the whipped cream into the condensed milk mixture using a rubber spatula, keeping the mixture light and fluffy.
Swirl the Biscoff: Pour half the ice cream mixture into a loaf pan. Drizzle half the melted Biscoff cookie butter on top. Add the remaining ice cream mixture and then drizzle the rest of the cookie butter. Use a knife or skewer to swirl everything together for beautiful ribbons.
Freeze: Cover the pan and freeze for at least 6 hours or until the ice cream is fully set.
Assemble the Sandwiches: Once frozen, line a baking sheet with parchment paper. Pair up Biscoff cookies by size. Scoop the ice cream onto one cookie, top with another, and press gently. Smooth the edges with a spatula and roll in crushed cookies if desired.
Set Again: Place the sandwiches on the baking sheet and freeze for another 30–60 minutes to firm up before serving.
Notes
For the cleanest sandwich edges, let the ice cream sit out for just 1–2 minutes before scooping.
A small offset spatula works great for smoothing out the ice cream once sandwiched.
Store sandwiches in an airtight container in the freezer, layered with parchment paper, for up to 2 weeks.
Want to make it extra fun? Try different spreads like Nutella or peanut butter, or even chocolate-dipped edges for a party-ready version!