Description
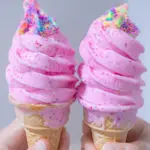
This bubblegum ice cream recipe is everything fun, pink, and nostalgic—without the eggs! Made with real bubblegum, it’s a creamy and playful dessert kids go crazy for and adults secretly love too. Whether you’re planning a birthday party, a retro-themed treat night, or just craving something whimsical and sweet, this no-egg bubblegum ice cream is your new go-to. Bonus? It’s super easy to make and endlessly customizable with sprinkles, drizzles, and candy toppings!
Ingredients
For the Bubblegum Base:
45 pieces of pink bubblegum (Bazooka or similar)
2 cups whole milk
1 cup heavy cream
2–3 tablespoons granulated sugar (adjust to taste)
Pinch of salt
For the Thickening Slurry:
1 tablespoon + 1 teaspoon cornstarch
2 tablespoons whole milk
Optional Add-ins:
A few drops of pink food coloring (for brighter color)
Rainbow sprinkles
White chocolate drizzle or shell
Sugar cones or waffle cones for serving
Instructions
Make the Slurry
In a small bowl, whisk together the cornstarch and 2 tablespoons of milk until smooth. Set aside.Prep an Ice Bath
Fill a large bowl with ice water. Nest a smaller bowl or zip-top bag inside it to cool the base quickly after cooking.Blend the Bubblegum
In a high-speed blender, combine the bubblegum pieces, whole milk, and heavy cream. Blend until fully smooth and pink.Strain (Optional)
If you want a silky-smooth texture, strain the blended mixture through a fine mesh sieve to remove any gum residue.Heat the Mixture
Pour the bubblegum base into a saucepan. Add sugar and salt. Heat over medium, stirring regularly, until it starts to steam—don’t let it boil.Thicken the Base
Whisk in the cornstarch slurry. Keep stirring over medium heat until the mixture thickens slightly (about 3–5 minutes). It should coat the back of a spoon.Cool It Down
Pour the warm base into your prepped ice bath container. Stir occasionally until it reaches room temperature. Then refrigerate for at least 4 hours or overnight.Churn
Pour the chilled mixture into your ice cream maker. Churn according to your machine’s instructions (usually 15–25 minutes) until it reaches soft-serve consistency.Freeze to Firm
Fold in rainbow sprinkles if using, then transfer the ice cream to a freezer-safe container. Freeze for 4 hours or until scoopable and firm.Serve and Decorate
Scoop into cones or bowls, top with white chocolate drizzle, extra sprinkles, or any of your favorite candy toppings. Enjoy every colorful bite!
Notes
If you’d rather not have any gum bits in your ice cream, strain the base after blending.
You can use bubblegum extract in place of real gum—start with 1 to 2 teaspoons and adjust to taste.
For a natural pink hue, try using a pinch of beetroot powder or freeze-dried strawberry dust instead of food coloring.
Want an even creamier texture? Sub ½ cup of the whole milk with more heavy cream.
Store ice cream in an airtight container with parchment pressed on top to prevent ice crystals. Best enjoyed within 2 weeks.
No ice cream maker? No problem—freeze the mixture in a shallow dish, stirring every 30 minutes for a few hours for a no-churn version.