

First off—thank you. Seriously. Thank you for being here, for seeking out something sweet and indulgent, and for trusting me with your dessert cravings. There’s something special about creating a treat from scratch that brings back childhood memories, fills the kitchen with laughter, and ends in a few quiet moments with a bowl of something cold and wonderful. That’s exactly what this Homemade Butterfinger Ice Cream delivers. It’s creamy, crunchy, and packed with candy bar nostalgia—and best of all, you don’t need an ice cream maker to pull it off.
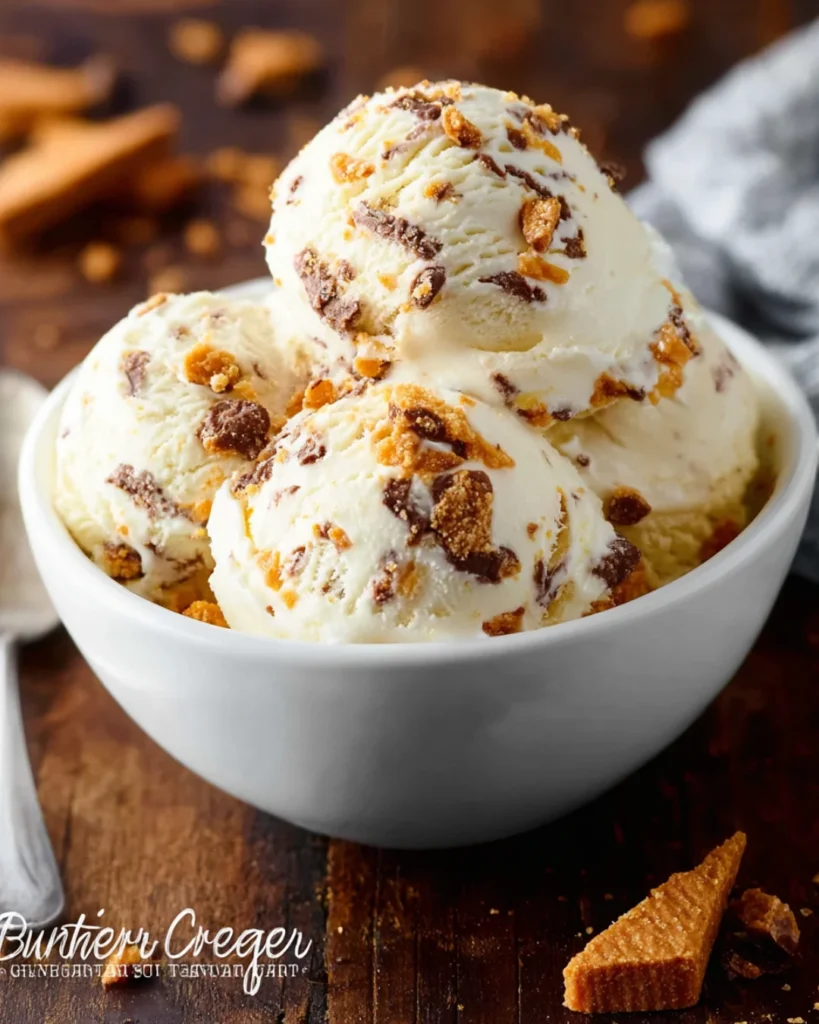
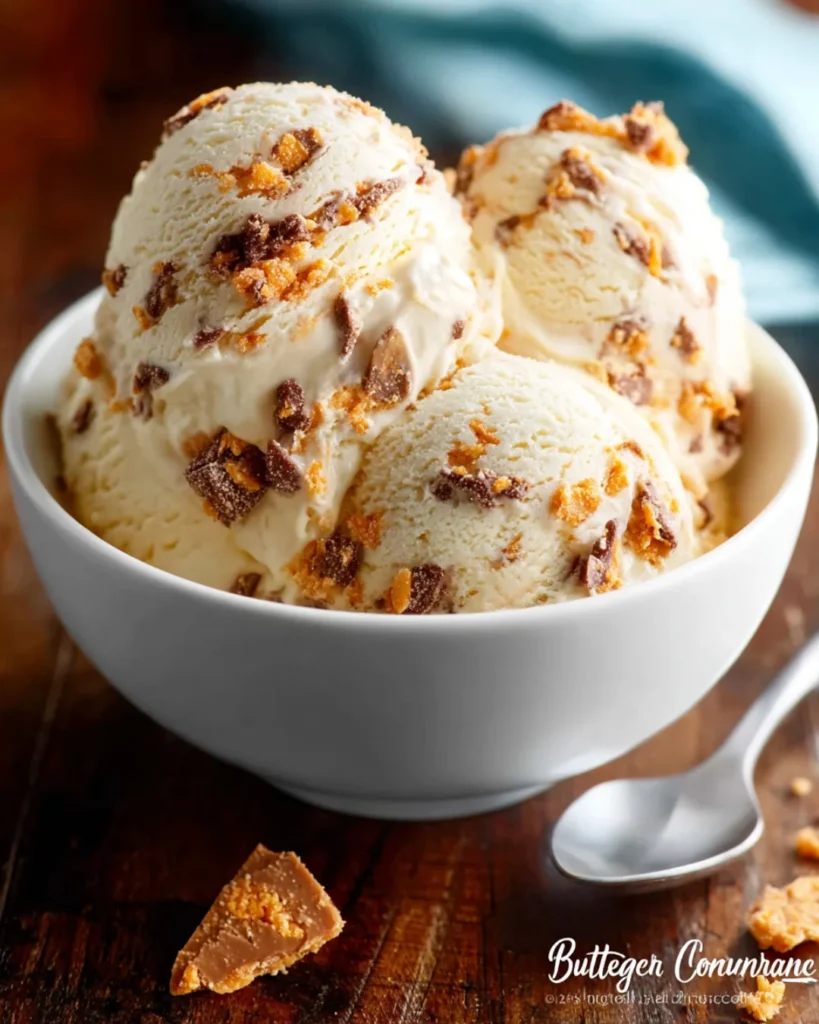
Homemade Butterfinger Ice Cream is a decadent no-churn dessert with a buttery vanilla pudding base, whipped into lightness with heavy cream, and loaded with crushed Butterfinger bars. It’s smooth, crunchy, and completely satisfying, whether you scoop it into cones, bowls, or sandwich it between two cookies.
Why You’ll Fall in Love with This Recipe
This ice cream is ridiculously easy to make—truly one of those set-it-and-forget-it kinds of recipes that taste like you slaved away for hours. I was experimenting one night with leftover Halloween candy (yes, that’s how this started), and the result was so good that I immediately regretted not doubling the batch.
So why does this no-churn Butterfinger ice cream deserve a permanent spot in your freezer?
Reasons to Love This Recipe
- No need for an ice cream machine
- Ready for the freezer in just 15 minutes
- Only seven ingredients, most of which you already have
- Buttery vanilla flavor with bits of crispy, peanut-buttery Butterfinger in every bite
- Easy to adapt with other candy bars or mix-ins
What It Tastes Like
Think rich, creamy vanilla soft serve—only better. Thanks to the instant pudding, the base is almost custard-like but without any cooking. Add in those crunchy, flaky Butterfinger pieces and you’ve got layers of texture and flavor in every spoonful: sweet, salty, buttery, and just a little chocolatey.
Why No-Churn Ice Cream Works
The combination of whipped cream and sweetened condensed milk creates a base that mimics churned ice cream in texture and scoopability. The pudding mix adds structure and a silky smoothness. It’s a foolproof method for anyone without an ice cream maker.
Ingredients (Makes About 1.5 Quarts)
Here’s what you’ll need to make this easy Butterfinger ice cream:
- 2 cups heavy whipping cream, chilled
- 1 (14-ounce) can sweetened condensed milk
- 1 (3.4-ounce) box instant vanilla pudding mix
- ½ cup cold milk
- 1 teaspoon vanilla extract
- 6–8 mini Butterfinger bars, crushed (or 3–4 regular-sized bars)
- Optional: extra crushed Butterfinger for topping
Tools You’ll Need
Nothing fancy here—just a few basics you probably already have in your kitchen:
- Hand mixer or stand mixer (for whipping the cream)
- Mixing bowls (one small, one large)
- Whisk and spatula
- Loaf pan or any freezer-safe container
- Plastic wrap or airtight lid
Ingredient Notes and Substitutions
One of my favorite things about this recipe is how easily it adapts to whatever you have on hand. If you’re missing something or want to mix things up, here are some options:
Don’t have Butterfingers?
Use chopped Heath bars, Reese’s cups, or Snickers. Each brings a different twist, but the texture and richness will still shine.
Dairy-free version:
Use full-fat coconut milk whipped cream alternative and a plant-based condensed milk (available in many health food stores). Omit the pudding or replace it with a cornstarch-thickened vegan vanilla mix.
More mix-ins:
Want to go over the top? Add crushed pretzels, swirls of peanut butter, mini chocolate chips, or caramel ribbons for a flavor explosion.
Vanilla extract options:
Try almond extract for a different profile or add a splash of bourbon if you’re serving adults.
How to Make Homemade Butterfinger Ice Cream: Step-by-Step Instructions
Step 1: Make the Pudding Base
In a small bowl, whisk together the instant vanilla pudding mix and cold milk. Within a minute or two, it will thicken to a smooth, pudding-like consistency. Set aside while you prepare the rest.
Step 2: Whip the Heavy Cream
In a large mixing bowl, whip the chilled heavy cream until stiff peaks form. This takes about 3–4 minutes with a hand mixer on medium-high speed. You want it fluffy and firm but not grainy.
Step 3: Combine Sweetened Condensed Milk and Pudding
In another bowl, stir together the sweetened condensed milk, vanilla extract, and prepared pudding. Mix until completely smooth and well-blended.
Step 4: Fold in the Whipped Cream
Add the whipped cream to the pudding mixture in batches, gently folding it in with a spatula. Be careful not to deflate the whipped cream—you want the mixture to stay airy and light.
Step 5: Add Crushed Butterfinger
Stir in the crushed Butterfinger bars, reserving a handful for topping. Make sure the pieces are evenly distributed throughout the mixture.
Step 6: Freeze
Pour the ice cream mixture into a loaf pan or freezer-safe container. Smooth the top and sprinkle with the remaining crushed Butterfinger. Cover with plastic wrap or a lid and freeze for at least 6 hours, or overnight for best results.
Step 7: Scoop and Serve
Before serving, let the ice cream sit at room temperature for 3–5 minutes to soften slightly. Scoop into bowls or cones and enjoy.
Serving Suggestions
This ice cream shines on its own, but here are a few ways to take it to the next level:
- Drizzle with hot fudge or peanut butter sauce
- Sandwich between chocolate chip cookies for the ultimate ice cream sandwich
- Serve over a warm brownie or blondie
- Add to a sundae bar with whipped cream, cherries, and crushed nuts
Tips for Success
- Always use cold heavy cream for best whipping results.
- Fold gently to avoid deflating the whipped cream. It’s okay if it takes a few extra turns.
- Crush your Butterfinger bars just before mixing for maximum crunch.
- A metal loaf pan speeds up freezing time, but any container with a lid will work.
- For a firmer scoop, freeze overnight.
Storage Tips
Store this homemade ice cream in an airtight container in the freezer for up to two weeks. To prevent ice crystals, press a piece of plastic wrap directly onto the surface before sealing the lid.
If the ice cream becomes too hard, let it sit at room temperature for 5–10 minutes before scooping.
Related Recipes You’ll Love
If you’re into candy bar-inspired, no-churn desserts, you’re definitely going to want to check out these next:
- Brownie Batter Ice Cream (No Churn) – Fudgy, decadent, and chocolate-loaded. It’s like licking the bowl, but better.
- Pineapple Ice Cream Swirl – A tropical swirl that’s bright, fruity, and super refreshing.
- Mountain Dew Ice Cream (No Churn) – Tangy, citrusy, and completely unexpected in the best way.
Frequently Asked Questions
Can I use full-sized Butterfingers instead of mini ones?
Yes, absolutely. Three to four full-sized bars will give you roughly the same amount of candy as 6–8 mini bars. Just crush them well before mixing in.
How long will this ice cream keep in the freezer?
It’s best within the first two weeks, but technically it will keep for up to a month. After two weeks, the texture may start to become icy.
Can I skip the pudding mix?
You can, but the texture may not be quite as creamy. The pudding helps stabilize the base and adds richness. If omitting, consider reducing the condensed milk slightly so it’s not too sweet.
What if I don’t have a mixer?
You can whip the cream by hand with a whisk—it will just take a little longer and some elbow grease. Use a chilled metal bowl for best results.
Is this gluten-free?
Butterfingers are generally considered gluten-free, but always check the label. The rest of the ingredients are gluten-free, so this recipe is easy to adapt if needed.
Can I use flavored pudding instead of vanilla?
Yes! Butterscotch or chocolate pudding would both pair beautifully with the Butterfinger candy pieces for a deeper flavor profile.
Final Thoughts
This Homemade Butterfinger Ice Cream is everything I love in a dessert—easy, indulgent, and nostalgic. It’s the kind of recipe that makes you feel like a kitchen rockstar with minimal effort. Plus, it’s endlessly adaptable depending on what candy or toppings you’re craving.
Whether you’re scooping it into cones for a backyard birthday party, layering it into sundaes on a movie night, or sneaking spoonfuls straight from the freezer (we’ve all been there), it’s a guaranteed hit.
If you’ve made it this far, I’d love to hear what you think! Leave a review below, share your photos on Pinterest, and let me know how you made it your own. Did you add a peanut butter swirl? Mix in pretzels? I’m all ears—and always hungry for new ideas.
Nutritional Information (Estimated Per Serving)
- Calories: 380
- Fat: 24g
- Carbohydrates: 36g
- Sugar: 31g
- Protein: 4g
- Serving Size: About ½ cup
- Servings per batch: 8

Homemade Butterfinger Ice Cream (No-Churn and Extra Creamy!)
Description
Homemade Butterfinger Ice Cream is a no-churn dream made with a buttery vanilla base, whipped cream, and loads of crushed Butterfinger candy bars. It’s extra creamy, quick to prep, and filled with that signature peanut-buttery crunch in every bite. Perfect for hot summer days, easy celebrations, or anytime you’re craving a sweet and crunchy frozen treat!
Ingredients
2 cups heavy whipping cream, cold
1 (14 oz) can sweetened condensed milk
1 (3.4 oz) box instant vanilla pudding mix
½ cup cold milk
1 teaspoon vanilla extract
6–8 mini Butterfinger bars, crushed (or 3–4 regular size bars)
Optional: extra crushed Butterfinger for topping
Instructions
In a small bowl, whisk together the vanilla pudding mix and cold milk until thickened (about 1–2 minutes). Set aside.
In a large bowl, whip the cold heavy cream until stiff peaks form (about 3–4 minutes with a hand mixer).
In a separate bowl, combine the sweetened condensed milk, vanilla extract, and the prepared pudding mixture. Mix until smooth.
Gently fold the whipped cream into the pudding mixture using a spatula. Fold just until no streaks remain.
Stir in most of the crushed Butterfinger bars, reserving a handful for topping if desired.
Transfer the mixture to a loaf pan or freezer-safe container. Smooth the top and sprinkle with extra candy pieces.
Cover and freeze for at least 6 hours or overnight until firm.
Let sit at room temperature for 3–5 minutes before scooping. Serve in bowls or cones and enjoy!
Notes
Make sure your heavy cream is cold before whipping—it makes a huge difference in volume and texture.
The pudding mix adds extra creaminess and helps stabilize the base, but you can skip it if needed (just reduce the milk slightly).
Try swapping Butterfinger with other candy bars like Reese’s, Heath, or Snickers for a different twist.
For best results, enjoy within two weeks and store in an airtight container with plastic wrap pressed against the surface to prevent ice crystals.
Want to make it a party? Serve this ice cream over brownies, in a sundae bar, or sandwiched between cookies!