
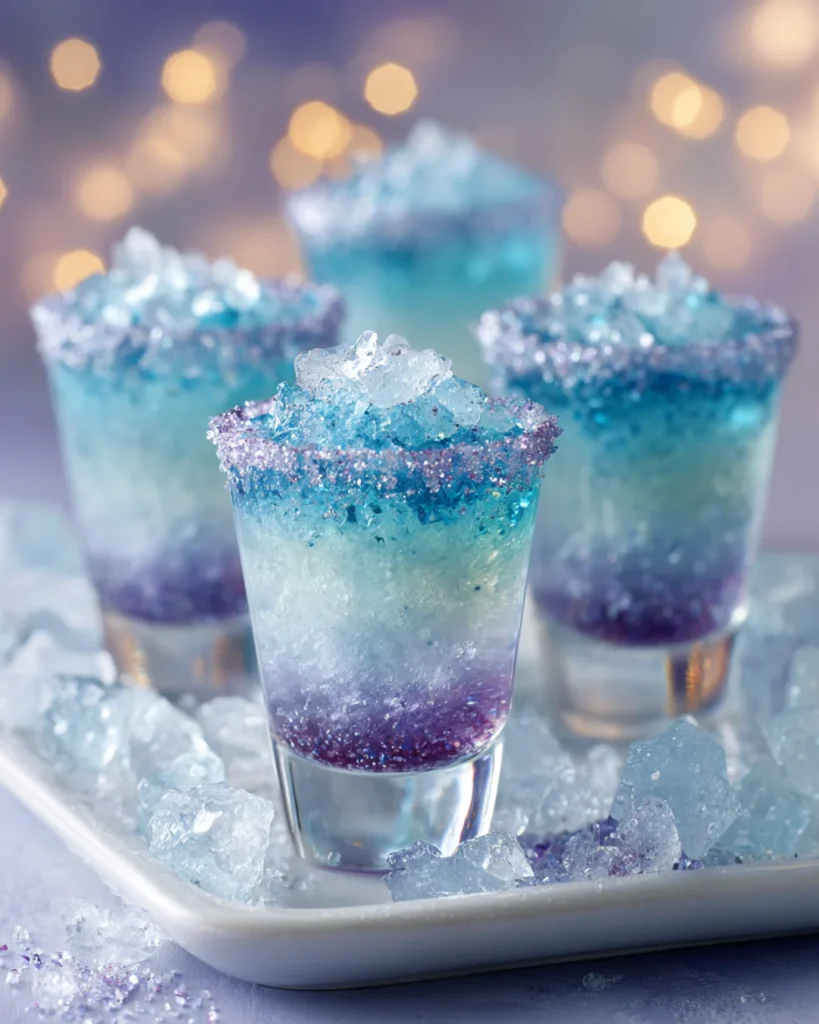
There’s something unmistakably magical about winter parties. Between the twinkling lights, glistening snowflakes, and glittery decor, the season practically begs for a cocktail that’s just as stunning and festive. That’s where these Ice Queen Shots come in. These sparkling blue and purple Jell-O shots bring all the elegance and whimsy of a winter wonderland into a single, bite-sized burst of flavor. Laced with peppermint vodka and topped with shimmering crushed candy “ice,” these little showstoppers will steal the spotlight at any holiday gathering or themed party.
And yes, they’re every bit as delicious as they are beautiful. With berry blue Jell-O forming the cool base, a kiss of mint from the vodka, and a sugary crunch from crushed candy canes or rock sugar, these shots are a textural and visual masterpiece. Whether you’re planning a Frozen-themed bash, a winter bridal shower, or just want to elevate your holiday hosting game, this is the Jell-O shot that does it all.
What Are Ice Queen Shots?
Ice Queen Shots are an elevated version of the classic Jell-O shot, with a chilly and glamorous twist. At their core, they’re berry-flavored gelatin shots spiked with peppermint vodka. But it’s their dazzling appearance that really sets them apart. Tinted icy blue with sparkling purple sugar rims and topped with crushed candy, they shimmer like frozen crystals. These are not your average party shots—they’re full-on edible jewels.
The flavor is reminiscent of berry slushies with a brisk, minty finish, while the texture is satisfyingly cool and jiggly. Every element of this recipe has been designed to evoke a frosty, enchanted aesthetic, and the result is something truly memorable.
Why You’ll Fall in Love With This Recipe
There are so many reasons why these Ice Queen Shots will quickly become a staple in your winter party lineup. Here’s why:
They’re visually stunning – The combination of vibrant blue gelatin, purple sugar rims, and clear candy “ice” gives these shots a magical, icy glow. They look just as good on a silver party tray as they do in Instagram photos.
They’re easy to make ahead – These can be prepared a day or two in advance and stored in the refrigerator until serving time, making them the ultimate stress-free party treat.
They’re crowd-pleasers – Whether you’re serving a group of cocktail enthusiasts or looking to impress partygoers with something unique, these shots deliver both flavor and flair.
They’re versatile – You can easily adjust the alcohol level, swap out the vodka flavor, or even make them alcohol-free for kid-friendly events.
They pair beautifully with other colorful or themed shots – Try presenting them alongside something fun and fruity like Pink Lemon Paradise Jell-O Shots or go for a pop culture twist with these Patrick Star Jell-O Shots to really dazzle your guests.
What Do They Taste Like?
Imagine biting into a cool berry popsicle with a refreshing peppermint breeze swirling through. The blue raspberry flavor delivers a juicy, fruity punch, while the peppermint vodka leaves a cooling sensation that lingers just enough. The crushed candy topping not only looks spectacular but adds a sweet, crunchy contrast that balances the texture of the smooth gelatin.
They’re sweet without being overpowering, minty but not medicinal, and full of frosty freshness—like the best parts of winter all packed into a shot glass.
Benefits of Making Ice Queen Shots for Your Event
Aside from their gorgeous presentation, Ice Queen Shots offer several practical benefits:
- Make-ahead convenience: These can be made a full 24–48 hours in advance, freeing up your time on the day of the event.
- Perfect portions: Each shot is portion-controlled, which helps you keep tabs on alcohol consumption and simplifies serving.
- Easy cleanup: With disposable shot cups or pre-rimmed glasses, there’s minimal mess to manage.
- Creative expression: Between the sugar rims, candy toppings, and potential for glittery additions, this recipe offers room for personalization.
Ingredients (Yields 12–14 Shots)
- 1 small box (3 oz) blue raspberry or berry blue Jell-O
- 1 cup boiling water
- ½ cup cold peppermint vodka (preferably clear or silver)
- ½ cup cold water
- Purple sanding sugar (optional, for rimming glasses)
- Crushed candy canes or clear rock sugar (for garnish)
Tools You’ll Need
- Heatproof mixing bowl
- Measuring cups
- Spoon or whisk
- Small plate (for rimming with sugar)
- Shot glasses or mini dessert cups (plastic or glass)
- Tray for easy transport to fridge
- Citrus wedge or light corn syrup (for prepping the rim)
Ingredient Substitutions and Additions
This recipe is open to customization. Here are some ways to adapt it:
- Vodka substitutes: If peppermint isn’t your flavor, try vanilla vodka for a sweeter, creamier profile or citrus vodka for something zestier.
- Different Jell-O flavors: Swap berry blue for grape or raspberry if you want to adjust the color scheme or flavor.
- Non-alcoholic version: Simply replace the vodka with an equal amount of cold water or clear soda like Sprite for a kid-friendly or sober option.
- Extra shimmer: Stir in a small amount of edible pearl dust or glitter before pouring into glasses for added sparkle.
- Layered shots: Want to go bolder? Add a layer of purple gelatin before the blue to create a two-tone Frozen effect.
How to Make Ice Queen Shots (Step-by-Step)
1. Prepare the Jell-O Base:
In a medium heatproof mixing bowl, add the berry blue Jell-O powder. Carefully pour in 1 cup of boiling water and whisk until the gelatin is completely dissolved—about 2 minutes of stirring.
2. Add Liquids and Chill Slightly:
Next, add ½ cup of cold water and ½ cup of cold peppermint vodka to the dissolved Jell-O. Stir to combine and let the mixture sit for 5 minutes to cool slightly. This cooling step helps preserve the decorative sugar rims later.
3. Prepare the Shot Glasses (Optional Step):
If you’d like to add a frosted sugar rim, pour some purple sanding sugar onto a plate. Lightly wet the rims of your shot glasses using a citrus wedge or a dab of corn syrup, then dip them into the sugar. Place the glasses on a tray.
4. Pour the Shots:
Using a spouted measuring cup or a syringe, carefully pour the Jell-O mixture into the prepared glasses, filling each about three-quarters of the way full.
5. Refrigerate Until Set:
Place the tray in the refrigerator and let the shots chill for at least 2 hours, or until they are fully set. For best results, allow 3–4 hours.
6. Add the “Ice” Garnish:
Right before serving, top each shot with crushed candy canes, clear rock sugar, or crystal sprinkles to create the illusion of icy shards. This adds a festive crunch and final touch of sparkle.
What to Serve with Ice Queen Shots
These shots are perfect on their own but even better when served as part of a themed dessert or cocktail table. Consider these pairings:
- White chocolate peppermint bark
- Sparkling vanilla cupcakes with blue frosting
- Sugar cookies dusted with edible glitter
- A winter-themed charcuterie board featuring pale cheeses, grapes, and frosted nuts
- Other Jell-O shot creations like the bright and citrusy Watermelon Pudding Shots for a fruity contrast
Their cool, minty profile makes them a great palate cleanser between savory bites, too.
Tips for Picture-Perfect Jell-O Shots
- Use a syringe or spouted measuring cup for clean, drip-free pouring
- Chill your vodka before mixing to help the gelatin set faster
- Let the Jell-O mixture cool slightly before pouring to protect sugar rims from melting
- Only garnish right before serving to prevent candy from dissolving
- Use matching colors in your serving tray or table decor for extra visual cohesion
Storage and Make-Ahead Instructions
You can make Ice Queen Shots up to three days in advance. After pouring and setting, loosely cover each glass with plastic wrap or place in a lidded container to protect the surface and prevent them from absorbing fridge odors. Store in the refrigerator until you’re ready to serve.
Do not add the candy garnish until just before serving, as moisture from the gelatin can cause the topping to become sticky or dissolve.

Frequently Asked Questions
Can I use a different flavor of vodka?
Absolutely. Vanilla or whipped cream vodka would be a sweeter, creamier alternative. Citrus or even coconut vodka could also work, depending on your flavor preferences.
Can these be made alcohol-free?
Yes! Just substitute the vodka with an equal amount of cold water or a clear soda like Sprite or 7-Up.
How long do Jell-O shots take to set?
Typically 2–4 hours in the refrigerator is enough, but they can sit overnight if needed.
Can I freeze them to speed up the process?
Freezing is not recommended. It can ruin the texture of the gelatin and cause the shots to separate or become grainy.
How do I transport them?
Use a cupcake tray or a baking pan lined with a towel to keep them upright. If you’re using disposable plastic cups with lids, that makes transport even easier.
Conclusion
Ice Queen Shots are everything you want in a party treat—gorgeous, delicious, easy to make, and just the right mix of whimsy and wow factor. They’re the perfect blend of winter magic and adult indulgence, and once you make them, you’ll find yourself dreaming up all kinds of reasons to break them out again.
Whether you’re throwing a winter-themed birthday, holiday party, or just want to dazzle your friends with something truly unique, these shots have the sparkle and flavor to make your celebration shine.
And if you’re already planning your next colorful cocktail creation, be sure to check out some of our other popular recipes like the vibrant Pink Lemon Paradise Jell-O Shots, quirky Patrick Star Jell-O Shots, or fruity Watermelon Pudding Shots.
Leave a Review and Share Your Creations
Did you try this recipe? I’d love to see how your Ice Queen Shots turned out! Leave a review below and tag your photos on Pinterest to show off your glittering masterpieces. Whether you followed the recipe to the letter or added your own personal flair, your frosty creations deserve the spotlight.
Nutritional Information (Per Shot – Approximate)
- Calories: 65
- Carbohydrates: 5g
- Sugars: 4g
- Protein: 0g
- Fat: 0g
- Alcohol: ~0.4 oz vodka per shot
Ice Queen Shots – Frost Yourself, Darling!
Description
Ice Queen Shots are a dazzling winter treat made with berry blue Jell-O, peppermint vodka, and topped with crushed candy “ice.” These shimmering blue and purple shots are perfect for winter parties, New Year’s Eve, or Frozen-themed gatherings. Cool, minty, and utterly glam—these are anything but boring! Make them ahead and let the sparkle steal the show.
Ingredients
1 small box (3 oz) berry blue or blue raspberry Jell-O
1 cup boiling water
½ cup cold peppermint vodka (clear/silver for best color)
½ cup cold water
Purple sanding sugar (optional, for rimming glasses)
Crushed candy canes or clear rock sugar (for garnish)
Lemon wedge or corn syrup (for rimming, optional)
Instructions
Dissolve the Jell-O: In a medium mixing bowl, whisk together the Jell-O powder and 1 cup boiling water. Stir until fully dissolved (about 2 minutes).
Add liquids: Mix in ½ cup cold water and ½ cup cold peppermint vodka. Let the mixture cool for 5 minutes.
Rim the glasses (optional): If adding a sugared rim, lightly wet the edges of the shot glasses with a lemon wedge or corn syrup. Dip into purple sanding sugar to frost. Set aside.
Pour into glasses: Carefully pour the Jell-O mixture into each shot glass, filling about ¾ full.
Chill: Place the filled glasses on a tray and refrigerate for at least 2 hours, or until fully set.
Garnish: Just before serving, top each shot with crushed candy canes or rock sugar for that icy, frosty finish.
Notes
These shots can be made up to 3 days ahead and stored in the fridge—just wait to garnish until right before serving.
To make a non-alcoholic version, replace vodka with cold water or lemon-lime soda.
Want to glam them up even more? Add edible glitter or shimmer powder to the mix before pouring.
Use a syringe or spouted measuring cup for clean and easy pouring.
For a layered effect, chill a purple Jell-O layer first, then pour the blue on top after it sets!