

Thank you so much for stopping by! I’m always so grateful to have you here, especially when I get to share recipes that are both whimsical and wildly delicious. Today’s creation is something I’ve been so excited to share—it’s sweet, fun to make, and surprisingly easy. Introducing the Oreo Cream Cheese Cheesecake Sushi Roll! A no-bake dessert that’s rich in flavor, packed with creamy texture, and dressed up in the most playful way possible. The Oreo Cream Cheese Cheesecake Sushi Roll takes a beloved cookie and turns it into something entirely unexpected—mini dessert sushi bites that look like something from a fancy patisserie but come together with pantry staples.
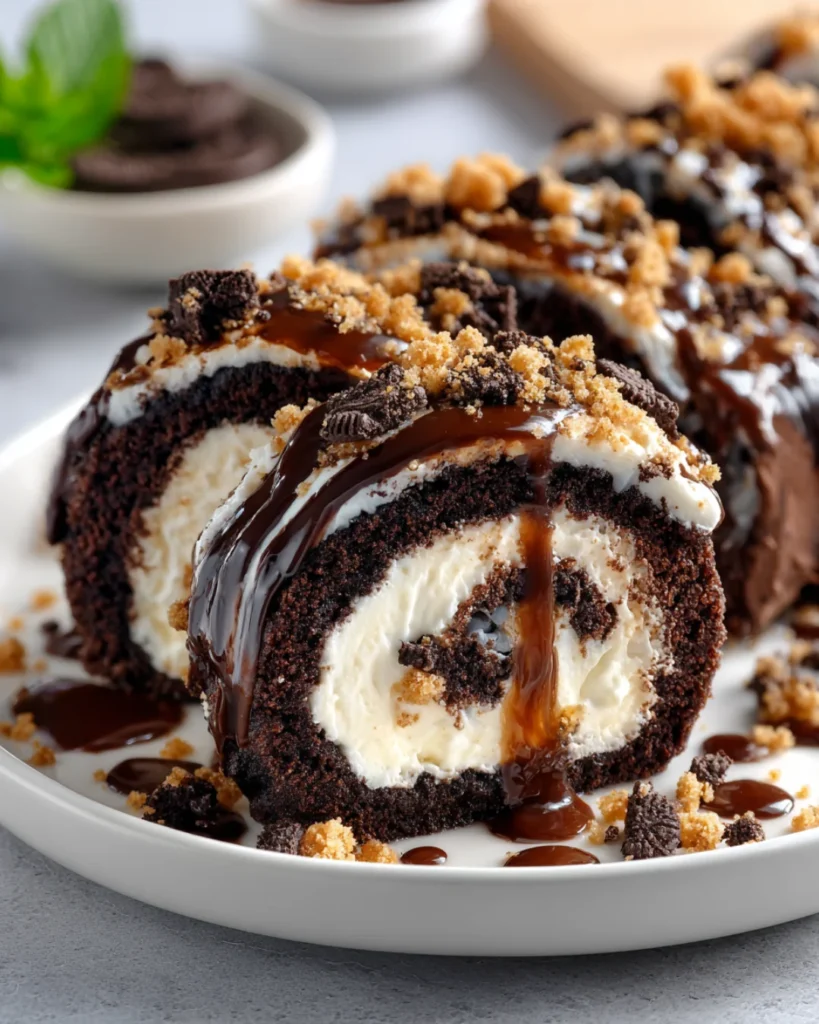
The Oreo Cream Cheese Cheesecake Sushi Roll features a crushed Oreo cookie outer layer (our “seaweed”), a light and fluffy sweet cream cheese filling (our “rice”), and garnishes like drizzled chocolate and extra cookie crumbs for flair. It’s charming, easy, and oh-so-satisfying. Perfect for parties, kids’ birthdays, or just when you want a dessert that surprises and delights.
What Is an Oreo Cream Cheese Cheesecake Sushi Roll?
This recipe is a clever dessert that mimics sushi but skips the raw fish and rice in favor of cookies and cream. The base is made from finely crushed Oreo cookies mixed with butter to form a pliable “dough” that stands in as the outer seaweed layer. Inside, a light and whipped cream cheese filling serves as the “rice,” bringing that cheesecake tang and luscious texture. When it’s all rolled up and sliced, you’re left with sushi-style bites that look as beautiful as they taste. Each slice is a little round of joy—sweet, creamy, and just the right amount of indulgent.
Reasons to Love This Recipe
There are so many reasons to keep this recipe on repeat:
- It’s completely no-bake, so you can make it year-round without heating up your kitchen.
- It uses simple, budget-friendly ingredients most of us already have on hand.
- It’s make-ahead friendly and stores well in the fridge or freezer.
- It’s incredibly fun to serve, especially when you want something eye-catching on the dessert table.
- It’s also endlessly customizable—play with flavors, toppings, and even fillings to make it your own.
What Does It Taste Like?
The flavor is everything you’d want from an Oreo-inspired dessert. Rich, chocolatey, and slightly salty from the cookie crumbs, with a soft, melt-in-your-mouth texture that contrasts beautifully with the whipped cheesecake filling. The cream cheese center is light yet luscious, offering a perfect tangy counterpoint to the sweet cookie shell. Add a drizzle of chocolate syrup and a sprinkle of extra crumbs, and the result is a multi-textured, layered dessert that satisfies every craving in one neat little package.
Why You’ll Want to Make It Again and Again
Not only is this recipe a major crowd-pleaser, but it also makes dessert prep feel like playtime. Whether you’re baking with kids, prepping for a dinner party, or just treating yourself to something new, this recipe is as fun to make as it is to eat. Plus, with just a few swaps or additions, you can completely reinvent it each time.
Want to dive deeper into creative no-bake desserts? Try some of our favorite inventive cheesecake spins like the Chocolate Eclair Cake (No Bake), the show-stopping Mermaid Swirled Cheesecake Recipe, or the nostalgic and colorful Fruity Pebbles Cheesecake. These all bring a playful twist to traditional treats—just like today’s recipe.
Ingredients (Makes 8–10 Slices)
For the “Seaweed” (Oreo Outer Layer)
- 24 Oreo cookies (crushed into fine crumbs)
- 3 tablespoons unsalted butter (melted)
For the “Rice” (Cheesecake Cream Filling)
- 8 ounces cream cheese (softened to room temperature)
- ¼ cup powdered sugar
- 1 teaspoon vanilla extract
- ½ cup heavy whipping cream (whipped to stiff peaks)
For Garnish
- Additional Oreo crumbs (for topping)
- Melted chocolate or chocolate syrup (for drizzling)
- Optional toppings: crushed graham crackers, mini chocolate chips, rainbow sprinkles
Tools You’ll Need
- Food processor (or zip-top bag and rolling pin for crushing cookies)
- Electric hand mixer or stand mixer
- Two medium mixing bowls
- Rubber spatula
- Rolling pin
- Parchment paper
- Sharp knife
- Plastic wrap or parchment for chilling
Ingredient Additions and Substitutions
This recipe is wonderfully adaptable. Here are some ideas to play around with:
- Substitute Golden Oreos or chocolate graham crackers for the cookie base if you prefer a vanilla or darker cocoa flavor.
- Use flavored cream cheese (like strawberry or chocolate) for a twist.
- Swap out the powdered sugar for a sugar-free version to cut down on sweetness.
- Fold in chopped strawberries, raspberries, or mini marshmallows to the cheesecake filling for texture and color.
- Use Nutella, peanut butter, or Biscoff spread as an additional layer inside the roll.
- Add a thin layer of jam before spreading the filling for a fruity note.
How to Make Oreo Cream Cheese Cheesecake Sushi Rolls
Step 1: Make the Oreo “Seaweed”
Start by placing the Oreo cookies into a food processor and pulsing them into fine crumbs. If you don’t have a processor, place them in a zip-top bag and crush them with a rolling pin until fine. Mix the crumbs with melted butter in a bowl until the texture resembles wet sand and starts to clump together.
Lay a sheet of parchment paper on your work surface, scoop the mixture onto it, and place another parchment sheet on top. Use a rolling pin to roll the mixture into a thin rectangle—about ¼ inch thick. This will be your outer wrap. Transfer it (still sandwiched in parchment) to the refrigerator for 20 to 30 minutes to firm up.
Step 2: Prepare the Cheesecake “Rice”
In a clean bowl, beat the softened cream cheese with an electric mixer until smooth. Add the powdered sugar and vanilla extract and beat until fluffy. In a separate bowl, whip the heavy cream to stiff peaks. Gently fold the whipped cream into the cream cheese mixture using a rubber spatula. The result should be light and spreadable, with a consistency that holds its shape.
Step 3: Assemble the Roll
Remove the chilled Oreo sheet from the fridge and carefully peel off the top parchment paper. Spread the cream cheese filling evenly across the surface, leaving about a half-inch border along one long edge to help seal the roll.
Starting from the filled edge, use the bottom sheet of parchment paper to guide the rolling process. Carefully roll the dessert up like a jelly roll or sushi roll, keeping it as tight as possible without squeezing out the filling.
Wrap the roll in parchment or plastic wrap and refrigerate for another 30 to 60 minutes to set the shape.
Step 4: Slice and Decorate
Once firm, unwrap the roll and use a sharp knife to cut it into 1-inch rounds. Wipe the knife clean between slices for the neatest presentation.
Drizzle the tops with melted chocolate or chocolate syrup and sprinkle with extra Oreo crumbs. You can also top with crushed graham crackers, sprinkles, or even a little sea salt for contrast.
What to Serve with Oreo Cheesecake Sushi
This dessert pairs beautifully with other no-bake treats or simple accompaniments:
- Serve alongside fresh strawberries, raspberries, or mango slices for a fruity balance.
- A scoop of vanilla or cookies-and-cream ice cream brings extra creaminess to the plate.
- For something fancy, add a dollop of whipped cream and a mint leaf on the side.
- If serving for adults, a chilled espresso martini or creamy liqueur makes a lovely pairing.
- Kids? Keep it simple with cold milk or chocolate milk—they’ll love the contrast.
Tips for Perfect Dessert Sushi Rolls
- Don’t skip the chilling stages. They’re essential for keeping the roll tight and sliceable.
- Use a very sharp knife to cut through the roll cleanly. Running it under hot water and wiping it dry between cuts can help.
- If the Oreo base cracks a little while rolling, gently press it together—it’s forgiving.
- Make sure your filling isn’t too soft. Whipping the cream to stiff peaks and folding it gently is key.
- Don’t overfill. Too much filling will squish out and make the roll hard to manage.
Storage Instructions
Refrigeration
Store leftovers in an airtight container in the fridge for up to 3 days. Keep them chilled until ready to serve to maintain their structure and texture.
Freezing
This dessert also freezes well. Wrap the unsliced roll tightly in plastic wrap and place in a freezer-safe bag. Freeze for up to 1 month. Let thaw in the refrigerator for 30 minutes before slicing and serving. You can even enjoy them slightly frozen for a firmer bite, almost like a cheesecake ice cream roll.

Frequently Asked Questions (FAQs)
Can I make this ahead of time?
Yes! In fact, it’s best made in advance to allow time for chilling and setting. Assemble the full roll up to 24 hours in advance and slice just before serving.
Can I use store-bought Oreo crumbs?
Absolutely. You’ll need about 2 cups of Oreo crumbs for the base.
Is there a dairy-free version of this recipe?
You can make it dairy-free by using plant-based cream cheese and coconut whipped topping. Just be sure to check that your cookies and butter alternatives are also dairy-free.
What if I don’t have a food processor?
Just use a zip-top bag and a rolling pin or heavy object to crush the cookies. It takes a bit more effort, but works just as well.
Can I use a different cookie?
Yes! Try chocolate graham crackers, vanilla wafers, or Golden Oreos for a different base flavor.
Final Thoughts
This Oreo Cream Cheese Cheesecake Sushi Roll is everything I love in a dessert—creative, comforting, and irresistibly tasty. It’s the kind of recipe that turns heads and brings smiles, whether you’re serving it to family, friends, or just treating yourself. I promised you versatile, and here’s proof. You can adapt, decorate, and serve this dessert in so many ways—and it always comes out a winner.
If you enjoyed this sweet sushi twist, I highly recommend checking out other no-bake favorites like the Chocolate Eclair Cake, the magical Mermaid Swirled Cheesecake, and the childhood dream that is Fruity Pebbles Cheesecake. They’re just as fun, vibrant, and perfect for parties or celebrations.
Join the Sweet Fun
If you try this recipe, I’d love to hear about it! Leave a comment below, share your photos on Pinterest, or tag me on Instagram. Your creativity and feedback are what make this space so special. Happy rolling—and happy eating!
Nutritional Information (Per Slice – Approximate)
- Calories: 210
- Total Fat: 14g
- Saturated Fat: 8g
- Carbohydrates: 18g
- Sugar: 12g
- Protein: 2g
- Fiber: <1g
- Sodium: 95mg

Oreo Cream Cheese Cheesecake Sushi Roll Recipe
Description
Oreo Cream Cheese Cheesecake Sushi Roll is a playful, no-bake dessert that transforms classic cookies and cream cheese into adorable sushi-style bites. With an Oreo crumb “seaweed” wrap and fluffy cheesecake “rice” filling, each slice is rich, creamy, and fun to serve. Perfect for parties, birthdays, or whenever you want to wow your guests with something totally unexpected!
Ingredients
For the “Seaweed” (Oreo Outer Layer)
24 Oreo cookies, finely crushed
3 tablespoons unsalted butter, melted
For the “Rice” (Cheesecake Cream Filling)
8 ounces cream cheese, softened
¼ cup powdered sugar
1 teaspoon vanilla extract
½ cup heavy whipping cream, whipped to stiff peaks
For Garnish (Optional)
Extra Oreo crumbs
Melted chocolate or chocolate syrup
Crushed graham crackers or mini chocolate chips
Instructions
Make the Oreo “Seaweed”:
Crush Oreo cookies into fine crumbs using a food processor or by hand in a zip-top bag. Mix the crumbs with melted butter until well combined and slightly sticky. Place the mixture between two sheets of parchment paper and roll into a thin rectangle about ¼ inch thick. Chill in the fridge for 20–30 minutes to firm up.Prepare the Cheesecake “Rice”:
In a mixing bowl, beat the softened cream cheese until smooth. Add powdered sugar and vanilla extract, and beat until light and fluffy. In a separate bowl, whip the heavy cream to stiff peaks. Gently fold the whipped cream into the cream cheese mixture until fully incorporated.Assemble the Roll:
Remove the Oreo sheet from the fridge and peel off the top parchment paper. Spread the cheesecake filling evenly over the Oreo base, leaving a ½-inch border on one long side. Carefully roll the sheet into a log, starting from the filled edge, using the parchment to guide it. Wrap tightly and chill for 30–60 minutes to set.Slice and Garnish:
Unwrap the chilled roll and slice into 1-inch thick pieces using a sharp knife. Wipe the knife between cuts for clean slices. Drizzle with melted chocolate and sprinkle with Oreo crumbs, graham cracker bits, or mini chocolate chips for extra flair.
Notes
For clean slices, run your knife under hot water and wipe dry before cutting.
You can substitute Golden Oreos, chocolate graham crackers, or use flavored cream cheese for variety.
Make this dessert ahead of time and store in the fridge for up to 3 days, or freeze the uncut roll for up to 1 month.
Kids love getting involved—let them help crush the cookies or decorate the slices!
Want more playful desserts? Check out our Mermaid Swirled Cheesecake, Chocolate Eclair Cake, or colorful Fruity Pebbles Cheesecake!