

Thank you so much for stopping by today. I’m always grateful when someone takes time out of their day to visit my little corner of the internet, especially when it means I get to share a recipe that’s this much fun. If you’ve been craving something bold, icy, a little nostalgic, and fully grown-up, I can’t wait for you to try this one. The Q Candy Dream Snow Cone is exactly what it sounds like—a dreamy, colorful, and candy-loaded frozen cocktail designed to thrill your senses and keep the party going.
What Is a Candy-Infused Snow Cone?
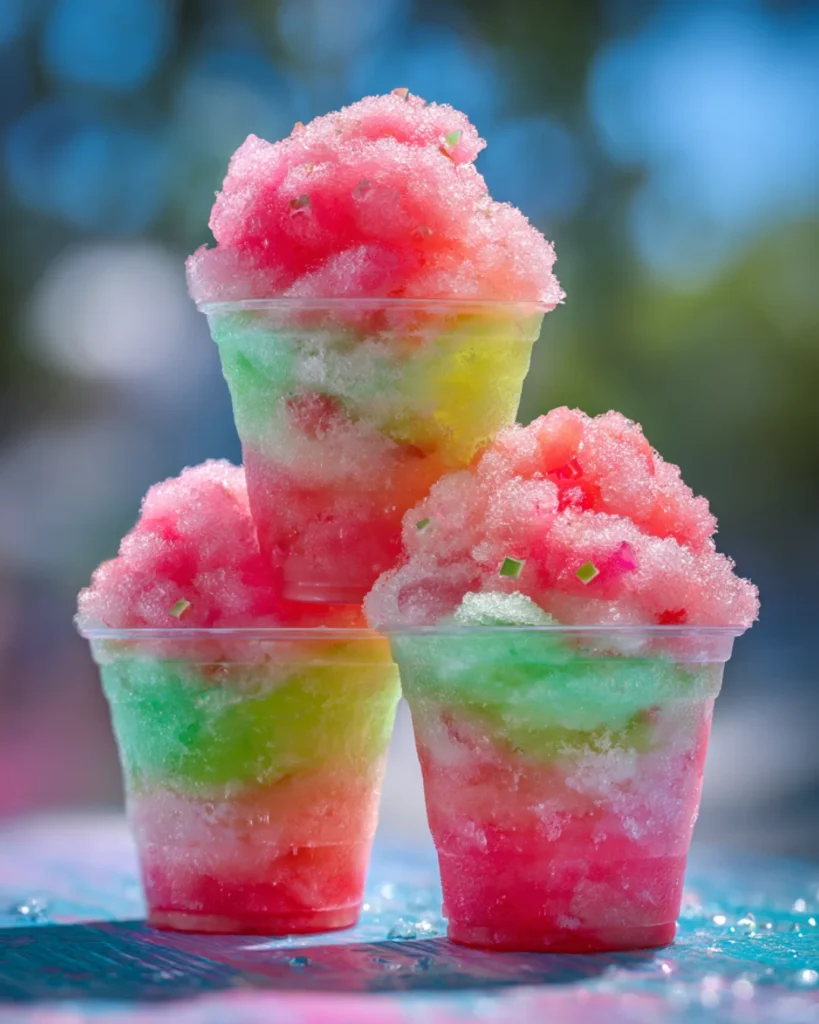
Let’s start with the basics. This isn’t your average gas station snow cone or even your standard beach boardwalk treat. This is a grown-up version that turns two childhood favorites—snow cones and candy—into a boozy dessert cocktail layered with tropical flavors and vibrant color. Imagine layers of shaved ice soaked in candy-infused rum and fizzy fruit sodas, topped with sour gummies and rainbow candy belts. The effect is joyful and playful with a distinct cocktail edge.
If you’ve ever wanted your dessert and your drink in the same glass, this is your answer. Every spoonful brings a mix of texture and flavor: fluffy snow, sharp boozy sweetness, tart soda sparkle, and chewy candy. It’s bright, bold, and unforgettably fun.
Reasons to Love This Frozen Boozy Dessert
There are dozens of reasons to fall head over heels for the Q Candy Dream Snow Cone, but let me highlight a few that really stand out:
- It’s visually irresistible. Neon colors, glossy candy toppings, and icy layers make for a total showstopper. Serve it in a clear glass to make the most of those color gradients.
- It delivers balanced flavor. It’s sweet, but not syrupy. The alcohol content is mellowed by soda and lemonade, while the candy infusion gives a nostalgic twist.
- You can customize it endlessly. Pick your favorite candies, swap the sodas, even mix in different spirits if you like.
- It’s perfect for parties. Serve these at a Pride celebration, birthday bash, summer BBQ, or just a Saturday night in with friends.
- It captures pure summer joy. This snow cone doesn’t take itself too seriously—and that’s the whole point.
What It Tastes Like
Think back to the feeling of being a kid in line at the snow cone stand—sticky fingers, sun on your face, and a rainbow cup of something icy and magical. Now, give that memory an adult upgrade. The Q Candy Dream Snow Cone starts with a hit of watermelon-candy rum that melts into triple melon lemonade. The green layer follows with a tart green apple soda bite, wrapped in the warmth of lime or sour-candy-infused rum.
Together, the layers are sweet, tangy, juicy, and electrified with that boozy buzz. The crushed ice gives you that cool, refreshing snow texture, while the candy toppings provide bursts of chewy, fizzy contrast.
Benefits of This Boozy Snow Cone
Beyond its taste and looks, this frozen cocktail offers several practical perks:
- It’s make-ahead friendly. Infuse the rum in advance, prep your mix-ins, and you’ll be ready to go when the guests arrive.
- Batch-ready for big crowds. It scales up easily. Want to serve 20? Just multiply everything and let guests assemble their own.
- Great for themed parties. Whether it’s retro carnival, neon rave, or rainbow birthday, this fits right in.
- No fancy bar skills needed. If you can shake a jar and layer some ice, you’re good.
Ingredients for Q Candy Dream Snow Cone
For the Candy-Infused Rums
- ½ cup watermelon candy-infused rum (use watermelon Jolly Ranchers or similar hard candy, dissolved in white rum)
- ½ cup tropical green candy-infused rum (infuse green apple, lime, or sour candy into white rum)
For the Liquid Base
- ¾ cup triple melon lemonade (store-bought options like Calypso or Minute Maid melon work great)
- ¾ cup green apple soda (Fanta Green Apple, Jones Soda, or similar)
For Assembly
- 6 cups crushed ice (processed to a snow-cone consistency using a machine or high-powered blender)
- Assorted fruity candies for garnish—think rainbow belts, sour stars, gummy worms, fruit chews, or lollipops
- Neon food coloring (optional, to intensify the vibrancy of the liquid layers)
Tools You’ll Need
You won’t need any barware beyond the basics. Here’s what helps:
- Two large glass jars (for infusing the rum)
- A snow cone machine or a powerful blender with ice-crushing capability
- Mixing bowls for combining rums and sodas
- Clear plastic cups or snow cone holders (for serving and layering)
- Long spoons and cocktail straws
- Optional: mini umbrellas or edible glitter for extra flair
Ingredient Substitutions and Custom Additions
This recipe is super flexible. Feel free to make it your own:
- Swap the candy. Can’t find watermelon Jolly Ranchers? Try Starburst, Nerds, or sour gummies.
- Change the soda. Any fruity soda works. For the green layer, try kiwi soda, lemon-lime soda, or even sour apple seltzer.
- Add sparkle. Edible glitter or shimmer dust adds an eye-catching finish.
- Go tropical. Add pineapple juice or coconut extract for a more island-inspired twist.
- Make it dairy-rich. Top with a scoop of coconut whipped cream or boozy whipped topping.
How to Make Q Candy Dream Snow Cones
Step 1: Infuse the Rums
Add 10 to 15 pieces of watermelon candy into one jar and 10 to 15 pieces of green candy into another. Pour ½ cup white rum into each jar. Let sit for 24 hours, shaking every few hours. You’ll know it’s ready when the candies are fully dissolved and the liquid is richly colored. If needed, strain out sediment.
Step 2: Crush the Ice
Using a snow cone machine or blender, crush ice into a soft, fluffy texture that resembles fresh snow. Store it in the freezer in an airtight container until you’re ready to assemble.
Step 3: Mix the Liquid Layers
In a small bowl, mix the watermelon rum with triple melon lemonade. In another bowl, combine the green candy rum with green apple soda. Add a drop or two of food coloring to each mixture if you want to intensify the tones. Keep chilled.
Step 4: Build the Cones
In each clear cup or cone holder, add:
- A layer of crushed ice
- A drizzle of the watermelon mixture
- More crushed ice
- A drizzle of the green apple mixture
Repeat if there’s space, then lightly tamp down with a spoon to help the liquid soak through and create a gradient effect.
Step 5: Top It Off
Garnish with your favorite candies. Try mixing textures—sour belts for length, gummy worms for fun, and a few crunchy candies like Skittles or Nerds for bite. Add straws and mini umbrellas for that final whimsical touch.
What to Serve with Candy Dream Snow Cones
This cocktail-dessert hybrid pairs beautifully with fun, tropical, or street-food-inspired bites. Here are some ideas:
- Mini fish tacos with mango salsa
- Pineapple chicken skewers with coconut rice
- Spicy shrimp ceviche
- Nachos with guava-pineapple salsa
- Mini corn dogs or fried pickle chips for a carnival flair
You can even make a full party theme with other frozen cocktail treats like the Velvet Sin Dessert Cocktail, a luscious and creamy indulgence that brings just as much drama to the table.
Tips for the Best Boozy Snow Cones
- Use fresh ice. Older ice tends to clump and can create icy pockets. Freshly crushed is best.
- Keep everything cold. Pre-chill your liquids and even your glasses if possible.
- Infuse ahead. The rum tastes better the longer it infuses. You can even prep it a week in advance.
- Don’t over-layer. Too many syrup layers can melt your snow cone quickly. Less is more.
- Go big or go bold. When it comes to candy and color, don’t be shy. This recipe celebrates excess.
Storage Instructions
While this dessert is best enjoyed immediately, you can prep most components in advance:
- Infused rum can be stored in an airtight jar for up to one month.
- Syrup mixtures can be made a day ahead and stored in the fridge.
- Crushed ice can be made a few hours ahead, but keep it tightly sealed in the freezer and re-blend or re-crush before serving.
Assembled snow cones don’t store well, so make and serve on the spot.

Frequently Asked Questions
Can I make this without alcohol?
Yes! Replace the rum with candy-infused soda or just use the flavored sodas directly. Kids and non-drinkers will love it too.
How long does it take to infuse the rum?
For full flavor, allow 24 hours. If you’re in a rush, even 8 hours will give you decent results.
Can I use premade snow cone syrup instead?
You could, but you’d miss out on the depth and novelty of the candy-infused rums. The DIY approach really makes it special.
Do I have to use food coloring?
Not at all—it’s just there for visual pop. The candy and soda will already provide some color on their own.
Final Thoughts on Q Candy Dream Snow Cone
If there’s one recipe that embodies the heart of summer—bold, bright, boozy, and just a little nostalgic—it’s this one. The Q Candy Dream Snow Cone is playful and party-ready, but it also rewards creativity. You can tailor every element to fit your vibe, your crowd, or your favorite flavors. And once you serve it, trust me, people will talk about it long after the last spoonful melts.
Whether you’re hosting an all-out bash or just want to add sparkle to your weekend, this frozen treat delivers. And if you’re as into these whimsical, colorful cocktail-desserts as I am, you’ll want to check out the Sweet Peach Behavior Frozen Peach Cocktail for another fruity hit, or cool off with the ultra-creamy Strawbabie Shake Boozy Milkshake—another dessert-meets-cocktail winner.
Share Your Dreamy Cones
Did you make the Q Candy Dream Snow Cone? I’d love to see your colorful creations! Tag me on Pinterest, leave a review, and share your candy combos, color layers, or wildest garnish ideas. This is one recipe where more is more—so don’t hold back.
Nutritional Information (Per Serving, Approximate)
Calories: 180
Sugar: 24g
Carbohydrates: 26g
Alcohol: 1 oz (varies by pour)
Fat: 0g
Protein: 0g
Q Candy Dream Snow Cone – A Boozy Rainbow Treat Bursting with Candy Joy
Description
The Q Candy Dream Snow Cone is a vibrant, boozy frozen cocktail treat layered with candy-infused rum, fizzy fruit sodas, and crushed ice—finished with a playful candy garnish. It’s made for summer parties, Pride parades, and anyone craving color and fun in every bite! Sweet, tart, and totally refreshing—this is anything but boring!!
Ingredients
For the Candy-Infused Rums:
½ cup white rum infused with watermelon candies (Jolly Ranchers or similar)
½ cup white rum infused with green candies (green apple, lime, or sour flavors)
For the Liquid Base:
¾ cup triple melon lemonade (Calypso or Minute Maid work great)
¾ cup green apple soda (Fanta, Jones Soda, or your favorite brand)
For Assembly:
6 cups crushed ice (snow-cone consistency)
Assorted fruity candies for garnish (rainbow belts, sour stars, gummy worms, etc.)
Neon food coloring (optional, to brighten up the rum layers)
Instructions
Infuse Your Rums
In two separate jars, add watermelon candies to one and green candies to the other. Pour in ½ cup white rum into each jar. Let infuse at room temperature for 24 hours, shaking occasionally until candies are dissolved.Prepare the Ice
Crush your ice using a snow cone machine or high-powered blender until fluffy and snow-like. Keep stored in the freezer until ready to use.Mix the Syrups
In one bowl, combine the watermelon-infused rum with triple melon lemonade. In another, mix the green-infused rum with green apple soda. Optional: Add 1–2 drops of food coloring to each for brighter, punchier layers.Layer the Snow Cones
In clear cups, alternate layers: crushed ice, watermelon mixture, more ice, green apple mixture. Repeat if your cup allows. Lightly tamp each layer with a spoon to create a dreamy gradient.
Garnish Like a Dream
Top with a mix of fruity candy (sour belts, gummies, stars). Add a neon straw or mini cocktail umbrella to finish it off in true party style!
Notes
Want to go alcohol-free? Just swap the rum for extra soda or a candy-flavored syrup—still fun, still fabulous!
Infused rum keeps up to a month in a sealed jar—great for prepping ahead.
For best results, chill all components before assembling to keep the layers icy and vibrant.
Don’t be shy with the candy toppings—this treat is all about colorful, joyful excess!