

There’s something about the magic of a summer evening that makes us crave a little indulgence. Maybe it’s the warmth in the air or the smell of something sweet toasting in the distance. Either way, if you’ve ever found yourself dreaming of something nostalgic yet totally new, this recipe is for you. I’m so grateful to be able to share this with you today because it’s one of those desserts that’s just plain fun—and utterly delicious.
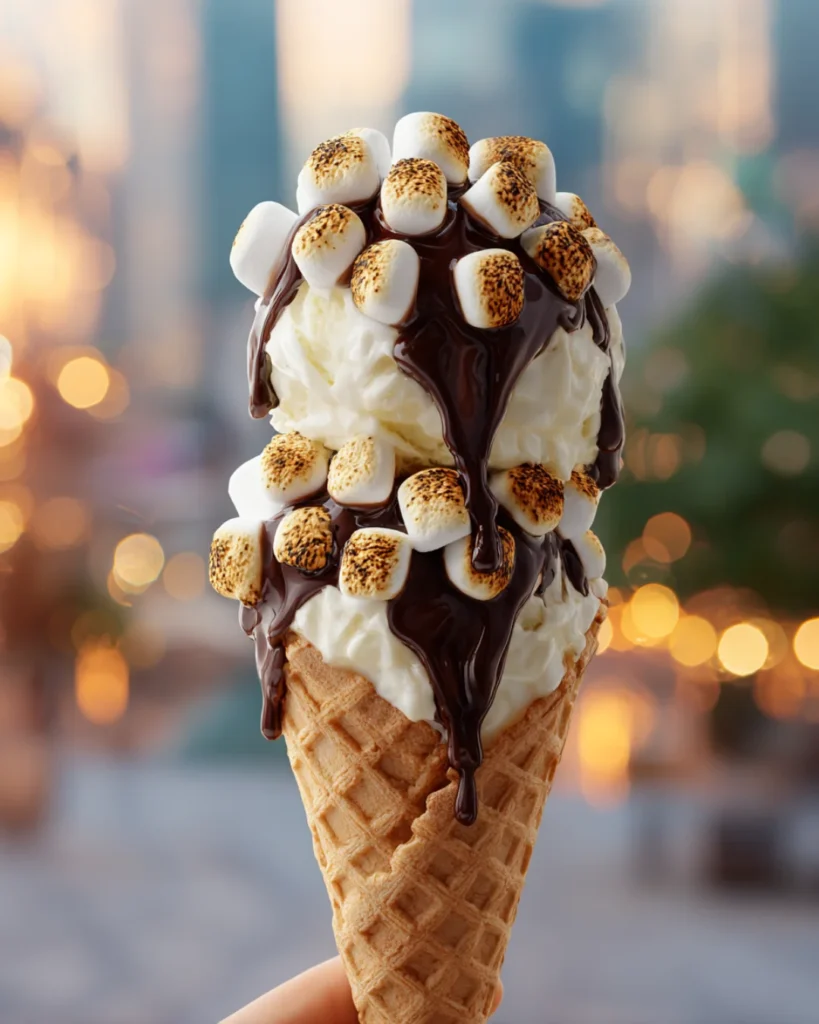
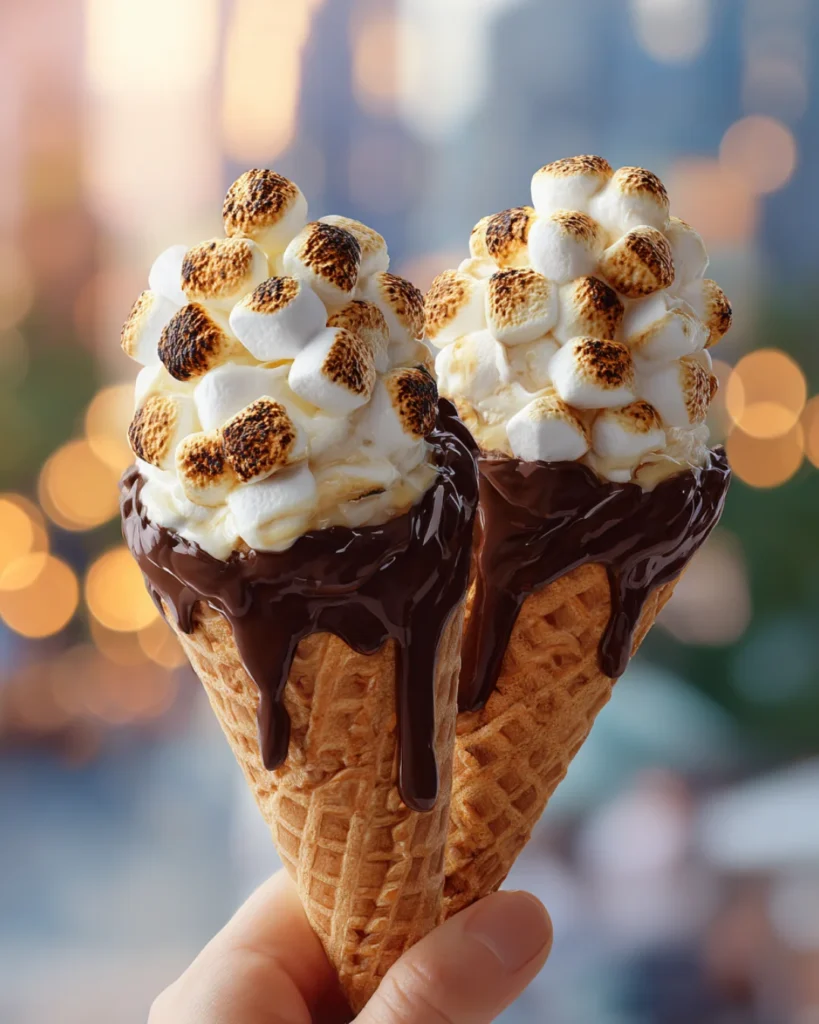
This S’mores Milkshake Cone recipe is everything you love about the traditional campfire treat, reinvented into a portable, ice-cream-loaded cone. It’s got the gooey toasted marshmallows, the drippy melted chocolate, and the crunch of graham crackers—but with the creamy coolness of vanilla ice cream nestled inside a crispy waffle cone. It’s summer in one incredible bite, and I’m convinced it deserves a spot on every backyard gathering, sleepover night, or just-because dessert menu.
What Is a S’mores Milkshake Cone?
At first glance, it might look like your standard ice cream cone, but there’s a lot more going on beneath the surface. This treat layers together marshmallow fluff (or mini marshmallows), vanilla ice cream, and rich chocolate syrup inside a crisp waffle cone. A quick toast with a kitchen torch gives it that iconic s’mores smokiness, while the optional crushed graham cracker adds texture and flavor reminiscent of the classic.
The term “milkshake” here is used playfully—there’s no blender involved. Instead, it captures the creamy, dessert-shop flavor profile of a traditional shake with the structure of a cone. So yes, it’s meant to melt, to drip, and to be enjoyed before it has a chance to settle.
Why You’ll Fall in Love with This Recipe
There’s something irresistibly fun about layering up your favorite ingredients and creating something that feels both nostalgic and new. This S’mores Milkshake Cone recipe is:
- Simple to make with no fancy equipment required. Just a torch and your sweet tooth.
- Perfect for parties, BBQs, and birthdays. It’s easy to make in batches and always a crowd-pleaser.
- Totally customizable. Play with flavors, toppings, and cone types to match your vibe.
- A feast for the senses. The creamy cold ice cream, warm toasted marshmallow, and crunchy graham cracker deliver a textural contrast that’s downright dreamy.
And if you’re a fan of creative desserts, be sure to check out this indulgent Strawberry Swirl Cone Recipe—it’s another fun twist on frozen treats that pairs beautifully with summer fruit.
What Does It Taste Like?
Each bite of this cone is a mix of cold, warm, crispy, gooey, and sweet. The vanilla ice cream acts as the neutral creamy base, while the toasted marshmallow fluff adds a smoky, chewy note that instantly takes you to campfire territory. Melted chocolate or chocolate syrup brings depth and richness, while the graham cracker crumbs add that signature crunch and a hint of honey sweetness.
The flavors are bold but balanced. You’ll get an immediate hit of vanilla and chocolate, followed by the toasty caramelized sugar of the marshmallow, all wrapped in the comfort of a crisp, golden cone. It’s playful, indulgent, and honestly kind of addictive.
Why Make S’mores Milkshake Cones?
We all need a go-to dessert that looks impressive, satisfies a serious sweet tooth, and is easy enough to whip up on a whim. This recipe checks all those boxes and more. Here’s why it deserves a place in your recipe rotation:
- It’s fast. From start to finish, you can make four cones in under 15 minutes.
- It requires minimal cleanup. No mixing bowls, no electric tools—just layer and torch.
- It’s interactive. Let guests customize their own cones at a party or create a dessert bar with different toppings.
- It brings out joy. Seriously, there’s something about that toasted marshmallow smell that just makes people smile.
Ingredients You’ll Need (Serves 4)
- 4 waffle cones
- 1 cup marshmallow fluff or mini marshmallows
- 4 large scoops vanilla ice cream
- 1/2 cup chocolate syrup or melted chocolate
- 1/2 cup crushed graham crackers (optional for garnish and texture)
- Optional: extra mini marshmallows for topping
- Butane or kitchen torch for toasting
If you’re already dreaming about variations, you might also love this flavor-packed Dr. Pepper Ice Cream No-Churn Swirl as an alternate base for the cones. It adds a spicy soda twist that’s surprisingly delightful when paired with chocolate and marshmallow.
Equipment and Tools
- Ice cream scoop
- Small spoon for spreading fluff
- Kitchen torch or butane torch
- Parchment paper or tray for assembly
- Cup or cone holder for display
- Optional: freezer-safe tray if prepping ahead
Ingredient Variations and Substitutions
- Ice Cream: Go classic with vanilla, or experiment with chocolate, marshmallow ripple, or cookies and cream. Even peanut butter ice cream would pair beautifully here.
- Chocolate: Use chocolate ganache, Nutella, or even peanut butter sauce instead of syrup.
- Marshmallow: Swap fluff with vegan marshmallows or coconut whip for a plant-based version.
- Graham Crackers: Replace with crushed Biscoff cookies, digestive biscuits, or even pretzels for a salty contrast.
- Waffle Cones: Sugar cones or gluten-free cones are both excellent alternatives.
Step-by-Step Instructions
1. Prep the Cones
If you’re going for the full s’mores effect, start by prepping your cones. Dip the top rims into melted chocolate or chocolate syrup, then immediately dip them into crushed graham cracker crumbs. Set them on a parchment-lined tray and let them rest while you prep the filling.
2. Add the Marshmallow Base
Spoon a generous amount of marshmallow fluff into each cone, letting some spill slightly over the edge for a gooey finish. If using mini marshmallows, fill the bottom of the cone and press them down slightly for a snug fit.
3. Toast the Marshmallow
Use a kitchen or butane torch to carefully toast the marshmallow layer until golden brown and slightly charred. Keep the flame moving in a circular motion to avoid burning.
4. Add the Ice Cream
Scoop a large, round portion of vanilla ice cream and gently press it into the marshmallow base. If your fluff is still warm, it will slightly melt the ice cream for a delectable effect.
5. Drizzle with Chocolate
Pour chocolate syrup or warm melted chocolate over the ice cream scoop. Let it drip organically down the cone—it’s part of the visual and flavor appeal.
6. Garnish as Desired
Add a few mini toasted marshmallows, a final swirl of marshmallow fluff, or a sprinkle of extra graham cracker dust on top. This is your moment to make it Instagram-worthy.
What to Serve with S’mores Milkshake Cones
These cones are a dessert all on their own, but you can create an unforgettable dessert board or bar by pairing them with:
- Fresh seasonal berries like strawberries, raspberries, or blueberries
- Extra chocolate-dipped waffle cones
- Small bowls of caramel sauce or fruit syrups
- A pitcher of iced cold brew or espresso for a sweet and bitter contrast
- Festive desserts like these Patriotic Candy Apples for summer celebrations
Tips for Success
- Work quickly. Once you scoop the ice cream, you’ll want to move fast—things melt quickly, especially on warm days.
- Keep the cones upright. Use a tall cup or cone holder to prevent tipping while assembling.
- Don’t overtorch. A light char is ideal. Too much heat can burn the fluff or melt the cone.
- Serve immediately. These are best enjoyed fresh for optimal texture and temperature contrast.
How to Store or Make Ahead
While these cones are best eaten right after assembling, you can prepare parts in advance.
- Make-ahead marshmallow cones: Assemble the marshmallow and graham cracker layers and store upright in the fridge. Torch just before serving.
- Frozen cones: Assemble completely and freeze individually wrapped in parchment paper. Let sit at room temperature for 5 minutes before serving and consider re-drizzling chocolate or retorching for freshness.
Frequently Asked Questions
Can I make this without a kitchen torch?
Yes. Place your prepared cones on a baking sheet lined with foil and broil them in the oven for about 30–60 seconds. Watch very closely—they can burn fast.
Can I use different ice cream flavors?
Absolutely. Chocolate, marshmallow ripple, or peanut butter ice creams all work beautifully. You can even try homemade no-churn options like this Dr. Pepper Ice Cream for a flavor twist.
Are there kid-friendly versions?
This recipe is already super kid-friendly! Just omit the torch step for younger chefs and let them decorate their own cones with sprinkles, mini chips, or candy pieces.
Can I use store-bought cones?
Yes! Store-bought waffle or sugar cones work perfectly. If you’re feeling ambitious, homemade cones are a fun project, but not necessary here.
Conclusion
There’s something incredibly satisfying about turning a nostalgic classic like s’mores into something unexpected, and this S’mores Milkshake Cone recipe delivers on every front. It’s fast, fun, and full of flavor—perfect for lazy summer days, festive nights, or anytime you want a little culinary adventure without much effort.
The layered textures and temperatures, the dreamy combination of creamy, crunchy, gooey, and crisp—it all adds up to a dessert that feels special. Whether you’re hosting friends, entertaining kids, or just indulging in a little solo treat, this cone brings the joy.
And if you’re inspired to try even more creative takes on cones and candy-themed delights, don’t miss these other must-try recipes:
I’d love to see what you create—tag your S’mores Milkshake Cone photos and variations on Pinterest or your favorite social platform. Don’t forget to leave a review if you try it out. Your feedback helps more readers discover the fun!
Nutritional Information (per cone – approximate)
- Calories: 320
- Total Fat: 14g
- Saturated Fat: 6g
- Sugar: 32g
- Carbohydrates: 45g
- Protein: 3g

S’mores Milkshake Cone Recipe – A Toasty, Drippy, and Dreamy Summer Treat
Description
This S’mores Milkshake Cone recipe takes everything you love about classic campfire s’mores—gooey toasted marshmallow, rich melted chocolate, and crunchy graham crackers—and layers it into a crisp waffle cone with creamy vanilla ice cream. It’s a toasty, drippy, dreamy treat that’s ready in minutes and perfect for summer nights, BBQs, or spontaneous sweet cravings.
Ingredients
4 waffle cones
1 cup marshmallow fluff or mini marshmallows
4 large scoops vanilla ice cream
1/2 cup chocolate syrup or melted chocolate
1/2 cup crushed graham crackers (optional, for garnish and texture)
Optional: extra mini marshmallows for topping
Kitchen or butane torch for toasting
Instructions
Prepare the cones by dipping the rims into melted chocolate or syrup, then into crushed graham crackers. Set aside to firm up.
Spoon marshmallow fluff into each cone, letting a little overflow for that gooey effect. Alternatively, use mini marshmallows pressed into the base.
Lightly toast the marshmallow layer using a kitchen torch until golden brown and slightly charred for that classic s’mores flavor.
Add a scoop of vanilla ice cream to each cone, pressing gently into the toasted base.
Drizzle warm chocolate or syrup over the top, letting it drip naturally over the sides.
Top with extras like mini toasted marshmallows, a final swirl of fluff, or a sprinkle of graham cracker dust. Serve immediately and enjoy every melty moment!
Notes
No torch? Place assembled cones (without ice cream) under a broiler for 30–60 seconds to toast the marshmallow. Watch closely!
Make it your own: Try different ice cream flavors like cookies & cream, peanut butter, or even this Dr. Pepper Ice Cream No-Churn Swirl for a fun twist.
Dairy-free version: Use plant-based ice cream and vegan marshmallows—just as delicious.
These cones are best made fresh but can be prepped in stages (like pre-toasting the marshmallow layer and storing in the fridge).
Want more summer treats? You’ll love this colorful Patriotic Candy Apples Recipe or the fruity Strawberry Swirl Cone Recipe.