

If you’ve ever dreamed of turning your favorite candy into a scoopable dessert, this is it. This Starburst Ice Cream (No-Churn, Pink Edition) is everything a sweet tooth could hope for—creamy, dreamy, and bursting with fruity candy flavor. Even better? You don’t need an ice cream machine. This is one of those magical recipes where a few simple ingredients and some patience in the freezer lead to something completely delightful.
This recipe was born out of a craving for something nostalgic but with a modern twist. And what’s more nostalgic than a pink Starburst? They were always the prized ones in the pack, and now they’re the star of the show—swirled into a silky, homemade ice cream base that tastes like a blend between strawberry milk and pink lemonade.
What Is Starburst Ice Cream?
Starburst Ice Cream is a no-churn frozen dessert made with melted Starburst candies, whipped cream, and sweetened condensed milk. It requires no ice cream machine and no special equipment beyond a hand mixer and your freezer. This pink edition focuses exclusively on pink Starbursts—arguably the most iconic and flavorful of the bunch—which get melted into milk and folded into a vanilla-scented, fluffy whipped cream base.
The resulting texture is creamy like soft serve, with ribbons of melted candy and a playful, fruity finish. It’s fun, it’s vibrant, and it’s unlike any store-bought ice cream you’ve had before.
Reasons to Love This Starburst Ice Cream
This recipe is for the curious, the nostalgic, and the color lovers. Here’s why it’s a keeper:
- No ice cream machine needed: Just whip, mix, and freeze.
- Five ingredients, one unforgettable flavor.
- The color alone makes it party-ready.
- A dessert both kids and adults will get excited about.
- Customizable with toppings and mix-ins for ultimate fun.
It’s also the perfect addition to a themed dessert bar or birthday celebration. Dress it up with edible glitter and candy bits, or serve it simply in a cone—it works either way.
What Does It Taste Like?
This ice cream hits the sweet spot between creamy and fruity. Imagine the silky texture of condensed milk ice cream mixed with the bold, juicy flavor of a pink Starburst—somewhere between strawberry and tropical punch. It has a pleasantly chewy note from the melted candy base, which adds to the richness and character of the dessert.
There’s also a subtle vanilla undercurrent that gives it that old-school ice cream flavor, grounding the candy sweetness in something familiar and comforting.
Benefits of This Recipe
- Beginner-friendly: No prior ice cream experience needed.
- Fast prep time: About 15–20 minutes of hands-on work.
- Make-ahead convenience: Freeze it overnight and it’s ready when you are.
- Budget-friendly: Uses common pantry items and one bag of candy.
- Customizable: Adjust sweetness, color, or candy mix-ins to your taste.

This no-churn Starburst ice cream is also a great base for trying out different candy-infused flavors, opening the door to endless creative variations.
Ingredients (Makes About 1 Quart)
- 1 cup pink Starburst candies, unwrapped
- ½ cup whole milk
- 2 cups heavy whipping cream, cold
- 1 (14-ounce) can sweetened condensed milk
- ½ teaspoon vanilla extract
- 1 to 2 drops pink gel food coloring (optional, for a more vibrant hue)
- Optional toppings: edible glitter, pink rock candy, or sprinkles
These are the essentials, but there’s lots of room to get creative with toppings and additions.
Tools You’ll Need
- Small saucepan
- Heatproof spatula or wooden spoon
- Mixing bowls (one preferably chilled)
- Hand mixer or stand mixer
- Rubber spatula
- Loaf pan or freezer-safe container
- Plastic wrap or airtight lid
Using a chilled bowl and beaters will help the cream whip faster and hold its shape better.
Ingredient Variations and Substitutions
There are many ways to tweak this recipe to suit your preferences or dietary needs:
- Use different Starburst flavors: Red or orange also work beautifully and give a slightly different flavor profile.
- Make it dairy-free: Use coconut cream in place of heavy cream and find a plant-based condensed milk (they’re widely available now).
- Boost the fruitiness: Stir in a bit of lemon or strawberry puree to enhance the candy’s natural fruit notes.
- Add texture: Crushed cookies, chopped marshmallows, or extra chopped candy make for exciting mix-ins.
You can also swirl in fruit jam or layer with bits of white cake for a trifle-inspired version.
Step-by-Step Instructions
1. Melt the Starbursts
In a small saucepan over low heat, combine the unwrapped pink Starbursts and whole milk. Stir constantly as the candies begin to melt and soften, about 5 to 7 minutes. The mixture should become smooth and thick like a fruit syrup.
Let this mixture cool for at least 5 to 10 minutes before moving on to the next step. You don’t want to melt your whipped cream!
2. Whip the Cream
In a chilled mixing bowl, whip the heavy cream to stiff peaks using a hand mixer or stand mixer. This should take about 3 to 4 minutes on medium-high speed. When the cream holds firm peaks and looks airy and thick, it’s ready.
3. Make the Ice Cream Base
In a large mixing bowl, combine the sweetened condensed milk, vanilla extract, and cooled Starburst mixture. Whisk until smooth. If you’re using food coloring, add a couple of drops now and stir to reach your desired pink intensity.
4. Fold It All Together
Use a rubber spatula to gently fold the whipped cream into the Starburst base. Work slowly and carefully—this step is essential to maintaining that signature no-churn ice cream fluff. Mix just until everything is combined and no white streaks remain.
5. Transfer and Freeze
Pour the mixture into a loaf pan or freezer-safe container. Smooth the top and add any toppings if desired—think edible glitter, crushed rock candy, or rainbow sprinkles.
Cover with plastic wrap pressed directly on the surface, or use an airtight lid. Freeze for at least 6 hours, preferably overnight, until solid.
6. Scoop and Enjoy
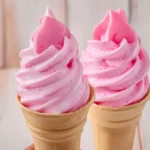
When ready to serve, remove the ice cream from the freezer and let it sit at room temperature for 5 to 10 minutes to soften slightly. Scoop into bowls or cones, and top with extra sprinkles, whipped cream, or even a Starburst chunk.
What to Serve with Starburst Ice Cream
This ice cream is a showstopper on its own, but it also pairs beautifully with other desserts. Try these ideas:
- Serve in waffle cones or sugar cones for a classic vibe
- Top with fresh berries for a tart contrast
- Sandwich between sugar cookies for a candy ice cream sandwich
- Add a scoop to cream soda for a fizzy float
- Layer into a candy trifle with whipped cream and sponge cake
It’s also excellent served alongside other no-churn ice creams. For a full dessert spread, try pairing it with other flavors like this indulgent Brownie Batter Ice Cream or a more refined Boston Cream Pie Ice Cream.
Tips for the Best No-Churn Starburst Ice Cream
- Use low heat to melt the Starbursts or they can burn and clump.
- Whip the cream until just stiff, not overbeaten, to keep the texture silky.
- Be gentle when folding—you want to preserve the fluffiness.
- Let the ice cream thaw slightly before serving so it’s scoopable.
- Use high-quality vanilla extract to balance the sweet candy flavor.
For added flair, serve the ice cream in a hollowed-out lemon or pink glass for extra visual impact.
Storage Instructions
Keep the Starburst ice cream in a tightly sealed container in the coldest part of your freezer. For best texture and flavor, enjoy it within 2 weeks. Pressing plastic wrap directly on the surface before sealing will help prevent ice crystals.
If it becomes too hard after long-term freezing, just let it sit at room temp for a few extra minutes before scooping.

Frequently Asked Questions
Can I use different Starburst flavors?
Yes, absolutely. You can swap in any flavor you love—red for cherry, orange for a citrus burst, or even a mix for rainbow swirls. Just keep the total candy amount to about one cup.
Can I make this recipe dairy-free?
Yes. Replace the heavy cream with chilled coconut cream, and use dairy-free sweetened condensed milk. It may alter the flavor slightly, but it will still be rich and creamy.
Can I skip the food coloring?
Definitely. The melted Starbursts already give the ice cream a subtle blush pink tone. The food coloring just adds intensity if you’re looking for that Instagram-worthy neon hue.
Do I need to strain the candy mixture?
Not unless there are visible clumps or unmelted bits. If your melted Starbursts are smooth, there’s no need to strain. If not, pass the mixture through a fine mesh sieve before mixing with the condensed milk.
How long will it last in the freezer?
About 1 to 2 weeks for best flavor and texture. After that, ice crystals may begin to form, and the flavor may dull slightly.
Final Thoughts
This Starburst Ice Cream (No-Churn, Pink Edition) is pure edible joy. It’s the kind of dessert that sparks conversation, delights kids and adults alike, and brings a smile with every bite. Whether you’re reliving childhood candy moments or looking to wow your friends with something completely unexpected, this recipe has you covered.
It also pairs beautifully with other no-churn favorites, like the chocolatey Brownie Batter Ice Cream, the decadent Boston Cream Pie Ice Cream, or the nostalgic Butterfinger Ice Cream.
Try it, love it, and don’t forget to make it your own.
Share Your Creations
If you make this Starburst Ice Cream, I’d love to see your take on it. Tag your photos on Pinterest, drop a comment below with your experience, or leave a star rating. Your feedback helps others discover just how fun and easy it is to turn candy into ice cream.
Nutritional Information (Approximate, per ½ cup serving)
- Calories: 310
- Fat: 18g
- Saturated Fat: 11g
- Carbohydrates: 34g
- Sugar: 30g
- Protein: 3g
Starburst Ice Cream (No-Churn, Pink Edition)
Description
Turn your favorite candy into a scoopable summer dream with this no-churn Starburst Ice Cream—pink edition! This creamy, fruity treat is loaded with melted pink Starburst candies for a nostalgic flavor and a vibrant swirl that’s anything but boring. No ice cream maker needed, just a hand mixer, some freezer time, and your sweet tooth. Whip it up for parties, birthdays, or anytime you’re craving something fun and totally unexpected!
Ingredients
1 cup pink Starburst candies, unwrapped
½ cup whole milk
2 cups heavy whipping cream, cold
1 (14 oz) can sweetened condensed milk
½ teaspoon vanilla extract
1–2 drops pink gel food coloring (optional, for brighter color)
Optional toppings: edible glitter, pink rock candy, or sprinkles
Instructions
Melt the Starbursts
In a small saucepan over low heat, combine the pink Starburst candies and whole milk. Stir constantly for 5–7 minutes, until the candies are fully melted and the mixture is smooth. Remove from heat and let cool slightly.Whip the Cream
In a chilled mixing bowl, whip the heavy cream using a hand or stand mixer until stiff peaks form. This will take about 3–4 minutes.Make the Base
In a separate large bowl, whisk together the sweetened condensed milk, vanilla extract, and the cooled Starburst mixture. Add pink food coloring, if using, and stir until fully combined.Fold Together
Gently fold the whipped cream into the Starburst base using a spatula. Mix until no streaks remain, being careful not to deflate the mixture.Freeze
Pour the ice cream mixture into a loaf pan or freezer-safe container. Smooth the top, then add any optional toppings like edible glitter or sprinkles.Chill & Serve
Cover tightly with plastic wrap or a lid and freeze for at least 6 hours, preferably overnight. Let sit at room temperature for 5–10 minutes before scooping and serving.
Notes
Candy swap: Try this with other Starburst flavors like red (cherry) or orange for fun variations!
Dairy-free option: Use coconut cream and dairy-free condensed milk to make it plant-based.
Topping ideas: Crushed sugar cookies, pink rock candy, or even mini marshmallows make for fun mix-ins.
Softer scoops: Let the ice cream sit out for 5–10 minutes before serving for the perfect texture.
Storage: Keep tightly covered in the freezer for up to 2 weeks. Pressing plastic wrap directly on the surface helps prevent ice crystals.