

Thank you for stopping by my kitchen today—whether you’re a long-time reader or someone new, I’m so grateful you’re here. If you’re anything like me, you know the joy of finding that perfect recipe: something that’s visually stunning, full of nostalgic flavor, and, best of all, easy to throw together without turning on the oven. That’s exactly what today’s recipe delivers.
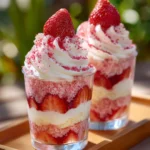
Let me introduce you to a dessert that always steals the show at parties, potlucks, and birthday celebrations: Strawberry Crunch Supreme Cups. These no-bake layered dessert cups are everything we love about creamy cheesecake, buttery vanilla cake, bright strawberries, and that unforgettable pink cookie crunch—all in one easy-to-serve individual portion. And yes, they taste even better than they look.
What Are Strawberry Crunch Supreme Cups?
Strawberry Crunch Supreme Cups are a no-bake layered dessert that mimics the flavor and texture of the classic strawberry shortcake ice cream bars many of us loved as kids. But instead of a frozen treat on a stick, we’ve upgraded it into an elegant, layered parfait-style dessert served in clear cups that showcase every colorful layer.
At the base, you’ll find a crumbly, buttery strawberry crunch made from crushed Golden Oreos and freeze-dried strawberries. Then comes a cloud-like cheesecake filling made without eggs or baking. Add in cubes of soft vanilla cake, a quick homemade strawberry glaze, and a generous topping of whipped cream and more crunchy crumble—and you’ve got yourself the perfect make-ahead dessert that’s both comforting and impressive.
Reasons to Love This Recipe
There are so many reasons this dessert has become one of my favorites and a reader favorite too. First, it’s completely no-bake, which is a lifesaver during the summer months or when you’re cooking multiple dishes at once. The assembly is super simple but looks incredibly fancy once it’s layered into clear cups or jars. You can make them ahead of time, and they’re easy to transport, serve, and customize.
They’re also incredibly versatile. Want to switch out the cake for pound cake or angel food cake? Go ahead. Only have store-bought strawberry topping on hand? It works like a charm. These cups are endlessly adaptable, which makes them perfect for last-minute gatherings or when you need a dessert that wows with minimal effort.
What Do They Taste Like?
Think of the best strawberry shortcake you’ve ever had, but creamier, crunchier, and even more indulgent. The cheesecake filling is soft and fluffy, with a rich vanilla flavor that contrasts perfectly with the sweet-tart strawberry glaze. The cake layer adds softness and structure, while the cookie crumble delivers the nostalgic flavor and texture that ties the whole dessert together.
If you grew up loving those iconic strawberry shortcake bars from the ice cream truck, you’ll immediately recognize the flavor profile—but this version is more decadent and dessert-table worthy. Each bite offers a mix of cool creaminess, fruity freshness, and satisfying crunch.
Benefits of This No-Bake Dessert
These dessert cups offer more than just good looks and great taste. Here are a few practical reasons they deserve a spot in your recipe rotation:
- No baking required, making them ideal for hot weather or busy kitchens.
- Perfect for parties—individually portioned and easy to serve.
- Customizable to suit different dietary needs or flavor preferences.
- Great make-ahead option that holds up beautifully in the fridge.
- Fun to assemble with kids or serve at themed events.

Ingredients List (Makes 6 Dessert Cups)
For the Crunch Crumble:
- 12 Golden Oreos, crushed into crumbs
- 2 tablespoons freeze-dried strawberries, finely crushed
- 2 tablespoons butter, melted
- Optional: 1 tablespoon strawberry gelatin powder for added color and flavor
For the Cheesecake Filling:
- 1 (8-ounce) block of cream cheese, softened to room temperature
- 1 cup heavy whipping cream
- ½ cup powdered sugar
- 1 teaspoon vanilla extract
For the Cake Layer:
- 1 cup cubed vanilla cake (store-bought, homemade, or from boxed mix)
For the Strawberry Glaze:
- 1 cup fresh strawberries, chopped
- 2 tablespoons granulated sugar
- 1 tablespoon lemon juice
- Optional: pre-made strawberry glaze or topping if you’re short on time
For Garnish:
- Whipped cream (homemade or store-bought)
- Whole strawberries
- Extra strawberry crunch crumble
Tools You’ll Need
You don’t need any fancy equipment to make this recipe, but a few basics will make the process smooth and enjoyable:
- Mixing bowls
- Electric hand mixer or stand mixer
- Silicone spatula
- Measuring cups and spoons
- Small saucepan
- Clear dessert cups, glasses, or small mason jars
- Spoon or piping bag for neat layering
Ingredient Additions and Substitutions
These cups are endlessly flexible. Try one of these substitutions to customize your cups based on what you have on hand:
- No Golden Oreos? Use graham crackers, shortbread cookies, or Nilla wafers.
- Need a gluten-free version? Use gluten-free cookies and cake.
- Want to save time? Use store-bought pound cake and strawberry topping.
- Looking to change up the flavor? Swap the strawberries for raspberries, peaches, or blueberries.
- Want to cut down on sugar? Use a sugar substitute in the glaze and filling.
Step-by-Step Instructions
1. Make the Crunch Crumble
Start by combining the crushed Golden Oreos, crushed freeze-dried strawberries, and melted butter in a bowl. If you’re using the gelatin powder for extra pink color and strawberry flavor, add that too. Stir until everything is coated and crumbly, then set it aside.
2. Prepare the Cheesecake Filling
In a mixing bowl, beat the softened cream cheese until it’s completely smooth and free of lumps. In a separate chilled bowl, whip the heavy cream until stiff peaks form. Fold in the powdered sugar and vanilla, then gently fold the whipped cream into the cream cheese mixture. You’ll end up with a smooth, fluffy filling that’s perfect for layering.
3. Make the Strawberry Glaze
Add the chopped strawberries, sugar, and lemon juice to a small saucepan. Cook over medium heat, stirring frequently, until the strawberries break down and the mixture becomes syrupy, about 7 to 10 minutes. Let the glaze cool completely before using. If you’re in a hurry, store-bought strawberry glaze works well here too.
4. Assemble the Dessert Cups
Start by adding about 1 to 2 tablespoons of the strawberry crunch crumble to the bottom of each cup. Add a spoonful of the cheesecake filling, smoothing it slightly with the back of a spoon. Then add a few cubes of vanilla cake and drizzle with strawberry glaze. Repeat the layers, finishing with more cheesecake and a final sprinkle of crumble.
5. Garnish and Chill
Top each cup with a generous swirl of whipped cream, another drizzle of strawberry glaze, and a final dusting of crunch crumble. Add a whole strawberry for a finishing touch. Chill the cups in the refrigerator for at least 30 to 60 minutes before serving. They can also be chilled overnight if you want to prepare them in advance.
What to Serve with Strawberry Crunch Supreme Cups
These dessert cups are delightful on their own, but if you’re planning a party, they pair beautifully with a variety of refreshing beverages. Here are a few drink ideas that complement their fruity, creamy flavors:
- Coco Melon Cocktail: A coconut watermelon cocktail that balances the richness of the dessert with tropical freshness.
- Strawberry Pineapple Mojito: Light, bubbly, and vibrant—perfect with any strawberry-based dessert.
- Grateful Dead Cocktail: A bold, colorful cocktail that matches the celebratory vibe of these party cups.
You can also serve the cups with a side of fresh fruit, mini chocolate chips, or even a scoop of vanilla ice cream for extra indulgence.
Tips for Success
- Chill your mixing bowls and beaters before whipping cream for best results.
- Let the strawberry glaze cool before layering or it may melt the cream filling.
- Use a piping bag to add the cheesecake filling neatly and evenly.
- For best texture, serve the cups within 24 hours of assembling.
- If you’re serving at an outdoor event, keep them in a cooler until ready.
Storage Instructions
Store leftover cups in the refrigerator for up to three days. Cover each cup with plastic wrap or use lids if you’re using mason jars. Keep in mind that the cookie crumble will soften over time, but the flavors will continue to meld and deepen. These are not ideal for freezing due to the dairy-based filling, which may separate when thawed.

Frequently Asked Questions
Can I make this recipe in a large dish instead of individual cups?
Yes! You can layer all the components in a trifle dish or 8×8 baking dish to make a larger version. It’s just as delicious and can serve more people.
Can I use frozen strawberries for the glaze?
Absolutely. Just thaw and drain them before using. You may need to cook them slightly longer to reach a syrupy consistency.
Can I make this dairy-free?
Yes, you can substitute with dairy-free cream cheese and coconut cream. Just be aware that the texture and taste will vary slightly.
Can I skip the strawberry glaze?
You can, but it really adds a nice fresh and tart element that balances the sweetness of the filling and cake. If you’re in a rush, a spoonful of strawberry jam thinned with a bit of lemon juice works too.
Final Thoughts
Strawberry Crunch Supreme Cups are everything you want in a dessert: simple to make, beautiful to serve, and bursting with nostalgic flavors that feel both playful and elegant. The combination of creaminess, cake, fresh berries, and buttery crunch is irresistible, and the individual servings make them a perfect treat for gatherings or just because.
If you loved this recipe, you’ll probably enjoy experimenting with some of my other layered dessert favorites. Check out these reader-loved ideas for more inspiration:
Let’s Stay Connected
Tried this recipe? I’d love to see your creations. Share your Strawberry Crunch Supreme Cups on Pinterest or tag me with your photos using #MmmRecipes. Your feedback helps me keep creating recipes you love—and who knows, you might inspire someone else to whip up a batch too!
Nutritional Information (Per Cup, Approximate)
- Calories: 380
- Fat: 24g
- Carbohydrates: 35g
- Sugars: 25g
- Protein: 4g
Strawberry Crunch Supreme Cups Recipe (No-Bake Layered Dessert for Parties)
Description
Strawberry Crunch Supreme Cups are a no-bake layered dessert made with creamy cheesecake filling, buttery vanilla cake, sweet strawberry glaze, and a nostalgic pink crunch topping. Each cup is perfectly portioned for parties or celebrations and comes together quickly with simple ingredients. They’re fun to assemble, chill beautifully, and always impress on the dessert table!
Ingredients
For the Crunch Crumble:
12 Golden Oreos, crushed
2 tablespoons freeze-dried strawberries, crushed
2 tablespoons butter, melted
(Optional) 1 tablespoon strawberry gelatin powder for added color and flavor
For the Cheesecake Filling:
1 (8 oz) block cream cheese, softened
1 cup heavy whipping cream
½ cup powdered sugar
1 teaspoon vanilla extract
For the Cake Layer:
1 cup vanilla cake, cubed (store-bought or boxed mix)
For the Strawberry Glaze:
1 cup fresh strawberries, chopped
2 tablespoons granulated sugar
1 tablespoon lemon juice
(Optional) store-bought strawberry glaze or topping
For Garnish:
Whipped cream
Whole strawberries
Extra pink crumble
Instructions
Make the Crunch Crumble:
In a bowl, mix together crushed Golden Oreos, freeze-dried strawberries, melted butter, and gelatin powder if using. Stir until crumbly and well-coated. Set aside.Prepare the Cheesecake Filling:
Beat the softened cream cheese until smooth. In a separate bowl, whip the heavy cream until stiff peaks form. Add powdered sugar and vanilla, then gently fold the whipped cream into the cream cheese mixture until light and fluffy.Cook the Strawberry Glaze:
In a small saucepan, combine chopped strawberries, sugar, and lemon juice. Simmer over medium heat for 7–10 minutes, stirring often, until thick and syrupy. Let cool completely.Assemble the Cups:
In clear dessert cups or jars, layer about 1–2 tablespoons of strawberry crunch. Add a spoonful of cheesecake filling, a few cubes of vanilla cake, and a drizzle of strawberry glaze. Repeat layers as desired.Garnish & Chill:
Top each cup with whipped cream, more strawberry glaze, a sprinkle of crunch crumble, and a whole strawberry. Chill for at least 30–60 minutes before serving.
Notes
For neat layers, use a piping bag for the cheesecake filling.
Store in the refrigerator for up to 3 days. Best enjoyed within 24–48 hours for maximum crunch.
No Golden Oreos? Graham crackers, shortbread cookies, or Nilla wafers work too.
Short on time? Use store-bought strawberry glaze and pre-baked cake to save time.
For a large batch version, layer the ingredients in a trifle dish instead of individual cups.
These are not freezer-friendly due to the dairy-based filling.