

First of all, thank you for being here. Whether you stumbled upon this post while searching for the ultimate summer cocktail or you’ve been following along on my kitchen experiments, I’m so glad you’re here. Sharing recipes like these Strawberry Piña Colada Snow Cone Shots fills me with so much joy. This one in particular? It’s a real show-stopper. Imagine layered, frozen cocktail slush with swirls of coconut piña colada and strawberry syrup — sweet, refreshing, and with just the right amount of rum to make you feel like you’re sipping something straight from a beachside tiki bar.
I’ll walk you through everything you need to know about this dreamy frozen dessert cocktail, from ingredients and step-by-step instructions to serving tips, variations, and storage advice. By the end, you’ll be prepped and inspired to bring a little tropical magic to your next party, date night, or solo chill session.
What Are Strawberry Piña Colada Snow Cone Shots?
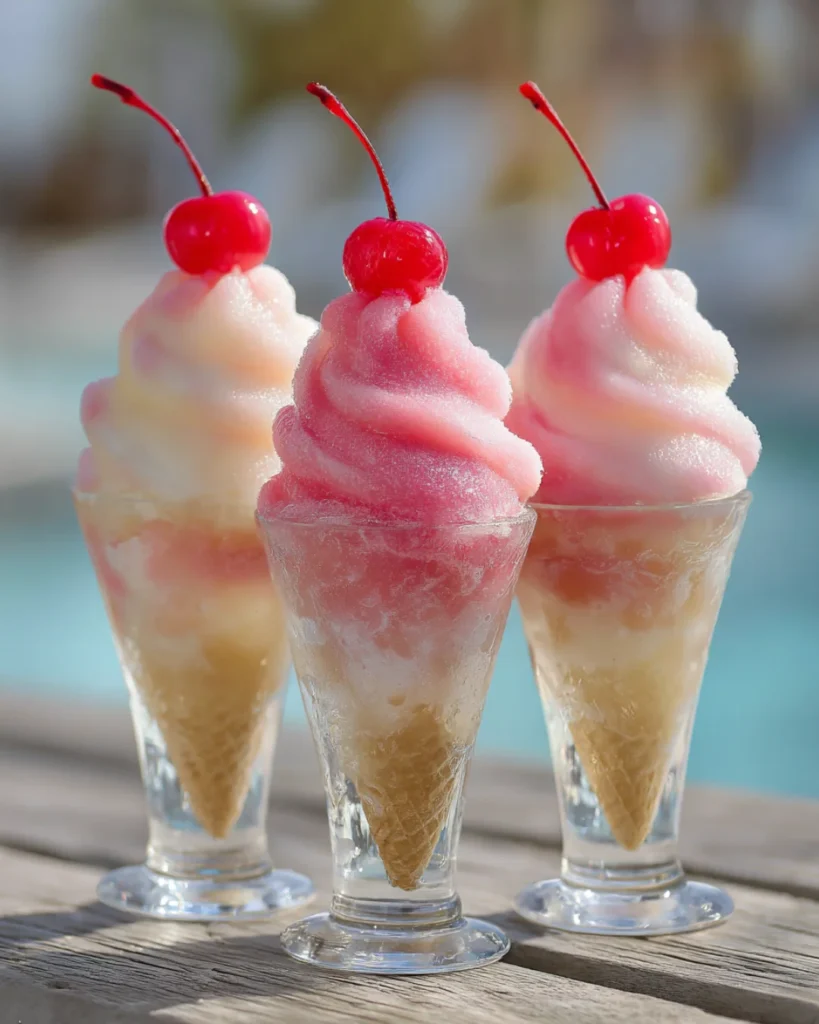
Strawberry Piña Colada Snow Cone Shots are a layered frozen treat that brings together the creamy, tropical flavor of a classic piña colada with the sweet-tart brightness of strawberries. Served in small snow cone-style cups or clear plastic glasses, these cocktail shots offer both the chill of a snow cone and the punch of a summer cocktail. They’re not just drinks — they’re part boozy dessert, part slushy, part eye candy.
Each serving features alternating swirls of icy coconut-pineapple rum slush and sweet strawberry purée or syrup. A maraschino cherry perched on top gives a nod to retro dessert vibes, and the layered look is perfect for parties or sharing on social media.
Reasons to Love This Recipe
There’s a lot to swoon over when it comes to these tropical snow cone shots. Here are just a few reasons I keep coming back to them:
- They’re ice-cold and ultra-refreshing, making them perfect for hot weather.
- The layered presentation is both visually impressive and easy to execute.
- They combine the nostalgia of snow cones with the grown-up fun of cocktails.
- The recipe is customizable — you can make it stronger, lighter, or even virgin.
- Great for parties: Easy to serve, eye-catching, and ideal for batch prep.
These shots are especially great for backyard BBQs, pool parties, girls’ nights, or any warm-weather celebration that calls for something fun and festive.
What Do They Taste Like?
The flavor combination here is pure vacation. The piña colada layer, with frozen pineapple juice, coconut milk, and white rum, is creamy and tropical with a touch of sweetness and a hint of richness. It’s everything you want from a classic beachside cocktail. The strawberry layer adds a fruity counterpoint — bright, juicy, and sweet, it cuts through the creaminess and balances the whole experience.
Together, the layers deliver a bold and balanced frozen cocktail that’s as fun to eat with a spoon as it is to sip with a straw. The texture is slushy and icy but with a creamy mouthfeel that melts on your tongue. It’s indulgent, but not heavy — just enough to leave you refreshed and ready for another.
Benefits of This Boozy Snow Cone Dessert
Let’s be honest: this isn’t a “health food” — but it does have its perks!
- Made with real fruit (especially if you use homemade strawberry purée)
- Naturally dairy-free, thanks to coconut milk
- No gluten or flour — friendly for those with sensitivities
- A relatively light dessert-cocktail hybrid
- Fun portion control: easy to serve in small cups or shot glasses
It’s also a great make-ahead option, meaning you can prep it and pull it out when guests arrive. That kind of stress-free fun is a gift in itself.
Ingredients List
For the Coconut Piña Colada Layer
- ½ cup white rum
- 1½ cups pineapple juice, frozen into cubes
- ½ cup canned coconut milk (full fat preferred for creaminess)
- 1 tablespoon light corn syrup
- 1 tablespoon white sugar
- 1 tablespoon cornstarch (optional, for added thickness)
- ¼ cup shredded coconut (optional, for texture and bite)
For the Strawberry Layer
- ½ cup sweetened strawberry purée or syrup
- Optional: splash of rum or vodka for extra kick
Garnish
- Maraschino cherries
- Optional: fresh strawberry slices
Tools You’ll Need
- High-powered blender (essential for getting that smooth slushy texture)
- Ice cube tray (to freeze the pineapple juice)
- Mixing spoon or straw (for swirling the layers)
- Small cups, cocktail shot glasses, or snow cone-style paper cups
- Freezer-safe container (for storing slush mixture between steps)
Ingredient Substitutions and Additions
This recipe is incredibly flexible. Here are some simple swaps and creative variations:
- Coconut milk: Use coconut cream for a richer layer, or almond milk for a lighter take
- Rum: White rum keeps it classic, but coconut rum or even tequila works well for different flavor profiles
- Strawberries: Swap for raspberries, mango, or even cherries if you’re in the mood to experiment
- Syrup vs purée: Store-bought strawberry syrup is quick and easy, but nothing beats fresh purée if you have the time
- Booze-free version: Skip the alcohol and use more pineapple juice or even a splash of coconut water
How to Make Strawberry Piña Colada Snow Cone Shots
Step 1: Blend the Piña Colada Slush
Start by blending the frozen pineapple juice cubes, white rum, coconut milk, corn syrup, sugar, and optional cornstarch. Blend until smooth and slushy. If you’re using shredded coconut, stir it in at the end for texture. Transfer this mixture to a container and place in the freezer for 15 to 20 minutes. This firms it up slightly so it layers better later.
Step 2: Make the Strawberry Layer
If using fresh purée, blend fresh or frozen strawberries with a tablespoon of sugar and a splash of rum or vodka if you want to keep the boozy theme. For a smoother consistency, strain the purée to remove seeds. If using a store-bought strawberry syrup, it can be used directly or mixed with a handful of crushed ice to give it more of a slushy consistency.
Step 3: Layer the Snow Cones
Spoon alternating layers of the piña colada slush and strawberry mixture into your serving cups. For the best swirl effect, use a spoon or straw to gently drag through the layers vertically. Don’t overdo it — just enough to create some beautiful marbled lines.
Step 4: Garnish and Serve
Top each serving with a maraschino cherry and, if you’re feeling fancy, a fresh slice of strawberry. Serve immediately with a spoon or straw. The layers melt quickly, so enjoy them right away for that perfect icy texture.
What to Serve With These Cocktail Shots
These frozen shots are fun all on their own, but they pair well with a light, summery spread. Try serving them with:
- Grilled shrimp skewers or coconut shrimp
- Chips and mango salsa
- Light ceviche or sushi bites
- Mini tacos or quesadillas
- Tropical fruit platters with melon, mango, and pineapple
They also make a perfect frozen “dessert shot” to cap off a summer dinner party or BBQ. Guests love the unexpected twist.
Expert Tips for the Best Results
- Freeze your pineapple juice in advance. This is crucial for the thick, icy consistency of the piña colada layer.
- Use full-fat coconut milk. It adds creaminess and helps the slush hold its texture.
- Taste and adjust. Depending on your ingredients, you may want a little more or less sweetness or alcohol.
- Chill your cups. If you want the layers to last a bit longer before melting, pop your cups in the freezer for 5 minutes before filling.
- Swirl just once. For a pretty layered look, a single, slow swirl is all you need. Too much mixing turns it into a pink slush!
Storage Instructions
These snow cone shots are best served immediately after assembling, but you can prepare the layers in advance.
- To make ahead: Store the coconut slush and strawberry mixture in separate airtight containers in the freezer for up to one week.
- Before serving: Let both layers sit at room temperature for 5–10 minutes so they’re scoopable, then layer and serve.
- Re-blend if needed: If the slush becomes too icy or solid, give it a quick whirl in the blender before serving.

Frequently Asked Questions
Can I make these without alcohol?
Yes. Just skip the rum and use additional pineapple juice or coconut water. The texture and flavor are still amazing without the alcohol.
Can I use store-bought piña colada mix?
You can, but making your own base from real pineapple juice and coconut milk gives a fresher, more authentic flavor. Store-bought mixes are often overly sweet and artificial.
How many servings does this recipe make?
This recipe makes about 4 to 6 small servings, depending on the size of your cups. You can easily double the recipe for a party.
Can I use a food processor instead of a blender?
A food processor might work, but a blender is better suited for creating a smooth slush consistency.
How boozy are these shots?
Each serving contains about 1 ounce of alcohol if made as written, so they’re on the lighter side compared to a traditional shot. Great for sipping and savoring!
Conclusion: Tropical Vibes in Every Spoonful
There’s something magical about a frozen treat that hits all the right notes — sweet, tangy, creamy, and just a bit boozy. These Strawberry Piña Colada Snow Cone Shots are more than a cocktail or a dessert. They’re an experience, a memory in the making, a little trip to the tropics in every bite. Whether you’re serving them at a summer bash, adding some flair to brunch, or enjoying a weekend indulgence, they bring color, flavor, and fun to the table.
I hope you give these a try and share the joy. I’d love to hear how they turned out for you — leave a comment below, rate the recipe, or share your creations on Pinterest. And if you love this style of boozy dessert shot, I’ve got more where that came from.
More Frozen and Fun Cocktail Dessert Recipes
If you enjoyed these snow cone shots, be sure to try these other crowd-pleasing cocktail treats:
Each one brings its own twist to the frozen or party-friendly cocktail game, and they’re all perfect for your next celebration.
Nutritional Information (Approximate per Serving)
- Calories: 160–190
- Carbohydrates: 22g
- Sugars: 18g
- Fat: 4g
- Alcohol: ~1 oz (depending on additions)
Strawberry Piña Colada Snow Cone Shots – A Boozy Tropical Dessert to Cool You Down
Description
Strawberry Piña Colada Snow Cone Shots are a fruity, frozen cocktail dessert layered with creamy coconut-pineapple slush and sweet strawberry syrup. Served in snow cone cups or shot glasses and topped with cherries, these tropical treats are a party favorite. They’re cool, colorful, and just boozy enough to bring beach vibes to any summer gathering. Make them ahead, swirl to impress, and serve chilled!
Ingredients
For the Coconut Piña Colada Layer:
½ cup white rum
1½ cups pineapple juice, frozen into cubes
½ cup canned coconut milk (full fat)
1 tablespoon light corn syrup
1 tablespoon white sugar
1 tablespoon cornstarch (optional, for thickness)
¼ cup shredded coconut (optional, for texture)
For the Strawberry Layer:
½ cup sweetened strawberry purée or syrup
Optional: splash of rum or vodka (for an extra boozy layer)
Garnish:
Maraschino cherries
Optional: fresh strawberry slices
Instructions
Make the Piña Colada Slush
In a blender, combine the frozen pineapple juice cubes, white rum, coconut milk, corn syrup, sugar, and optional cornstarch. Blend until smooth and slushy. Stir in shredded coconut if using. Transfer to a container and freeze for 15–20 minutes while you prep the strawberry layer.Prepare the Strawberry Layer
If using purée, blend fresh or frozen strawberries with sugar and optional rum until smooth. Strain if desired for a silky texture. If using syrup, use as-is or mix with crushed ice for a slushier feel.Layer the Snow Cones
In each small cup or snow cone glass, alternate spoonfuls of the piña colada mixture and the strawberry layer. Use a spoon or straw to gently swirl vertically for a marbled look.
Garnish and Serve
Top with a maraschino cherry and optional fresh strawberry slice. Serve immediately with a spoon or straw.
Notes
Freeze pineapple juice into cubes ahead of time for best texture.
Use full-fat coconut milk for the creamiest result.
Adjust alcohol amounts to taste, or omit completely for a virgin version.
Store both layers separately in the freezer for up to one week and assemble before serving.
For extra chill, freeze your serving cups for 5–10 minutes before layering.
Makes 4–6 small servings, perfect for parties or small gatherings.