

There’s something undeniably magical about summer desserts—the ones that instantly bring back sun-drenched afternoons, barefoot evenings, and the carefree joy of chasing the ice cream truck down the street. This Homemade Strawberry Swirl Cone captures all of that in one bright, creamy, no-churn package. It’s swirled with layers of real strawberry and velvety vanilla soft serve, spooned or piped into crisp waffle cones coated in rainbow sprinkles and white chocolate. This treat is light, airy, fruity, and just indulgent enough to make any day feel like a celebration.
What Is a Strawberry Swirl Cone?
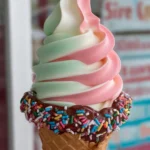
This recipe is a no-churn soft serve ice cream that’s designed for ease, flavor, and visual appeal. It consists of two creamy components: a sweet-tart strawberry base made with real fruit and a smooth, rich vanilla base. These two flavors are chilled separately, then swirled together using a piping technique to create beautiful ribbons of flavor. Once frozen to soft-serve consistency, it’s piped into fun, sprinkle-rimmed waffle cones and served with extra toppings if desired.
No ice cream maker needed. No eggs, no stovetop custard, no fuss. Just a few key ingredients, a bit of chilling time, and a swirl of creativity.
Why You’ll Love This Homemade Strawberry Swirl Cone
There are countless reasons to fall in love with this dessert:
- It’s no-churn. That means no ice cream maker, no fancy equipment, and no intimidating steps.
- Fresh strawberries are the star. The flavor is bright, real, and summery.
- The texture is cloud-like. Thanks to whipped cream and condensed milk, you get a light, scoopable finish that’s creamy without being too dense.
- It’s a showstopper. Visually, the pink-and-white swirls look just like something from a specialty dessert shop.
- Perfect for parties. These cones are festive, fun, and can be made ahead of time—ideal for birthdays, barbecues, and beach days.
- Customizable. You can easily switch up the fruit or try different mix-ins depending on your mood or what you have on hand.
What Does It Taste Like?
The flavor of this ice cream is pure summer: sweet, juicy strawberries balanced by smooth vanilla cream. The whipped cream base keeps it airy and soft, while the condensed milk brings sweetness and richness. The cones provide a satisfying crunch with a sweet, candy-like touch from the white chocolate and sprinkles. Together, each bite offers a perfect mix of fruity freshness, creamy decadence, and nostalgic charm. It’s like biting into a strawberry shortcake cloud—with sprinkles.
Healthier and Practical Benefits
Beyond taste and appearance, there are some real benefits to this homemade treat:
- Control your ingredients. Unlike store-bought versions, you’re skipping preservatives, stabilizers, and artificial flavors. This recipe uses just a handful of recognizable ingredients.
- No cooking required (except for a quick fruit simmer). That’s right—no slaving over a custard base.
- Make ahead. Once frozen, this treat holds beautifully for several days, making it perfect for planning ahead.
- Kid-friendly. From dipping cones to swirling the cream, little hands can easily help out.

Ingredients (Makes Approximately 6 Cones)
For the Strawberry Soft Serve Base:
- 1 cup fresh strawberries, hulled and chopped
- 1 tablespoon lemon juice
- 2 tablespoons sugar
- 1 cup heavy whipping cream
- ½ cup sweetened condensed milk
- ½ teaspoon vanilla extract
- Optional: 1–2 drops pink food coloring for brighter color
For the Vanilla Base:
- 1 cup heavy whipping cream
- ½ cup sweetened condensed milk
- ½ teaspoon vanilla extract
For the Cones:
- 6 waffle cones
- 2 tablespoons white chocolate or candy melts, melted
- Rainbow sprinkles (for rimming the cones)
Tools You’ll Need
- Hand mixer or stand mixer
- Small saucepan
- Blender or immersion blender
- Mixing bowls and spatulas
- Piping bags (or plastic zip-top bags)
- Freezer-safe container
- Small bowls for dipping and decorating cones
Ingredient Additions and Substitutions
This recipe is very adaptable. Here are some ideas to make it your own:
- Use frozen strawberries if fresh aren’t available—just thaw and drain before simmering.
- Swap the fruit. Try raspberries, peaches, or blueberries in place of strawberries.
- Boost the flavor. Add a splash of strawberry or vanilla extract for a stronger profile.
- Go dairy-free. Substitute coconut cream for heavy cream and a non-dairy condensed milk alternative.
- Add mix-ins. Mini chocolate chips, crushed graham crackers, or freeze-dried fruit pieces can be folded into either base.
How to Make the Strawberry Swirl Cone Step-by-Step
Step 1: Make the Strawberry Soft Serve Base
Start by placing the chopped strawberries, sugar, and lemon juice in a saucepan. Simmer over medium heat for 5–7 minutes until the strawberries become soft and release their juices.
Remove from heat and allow the mixture to cool slightly. Blend until smooth using a blender or immersion blender.
In a mixing bowl, whip 1 cup of heavy cream until soft peaks form. Gently fold in the sweetened condensed milk, vanilla extract, and the cooled strawberry purée. Add food coloring if desired.
Cover and refrigerate for 30–60 minutes to firm up slightly.
Step 2: Make the Vanilla Base
In a separate bowl, whip another cup of heavy cream to soft peaks. Fold in the sweetened condensed milk and vanilla extract until smooth.
Chill this mixture as well, keeping it separate from the strawberry base.
Step 3: Swirl and Freeze
For a clean swirl effect, spoon each chilled mixture into separate piping bags. Then place both bags inside a larger piping bag, or tape them side-by-side inside a zip-top freezer bag and cut the tip.
Pipe the mixture into a freezer-safe container using a swirling motion. Alternatively, spoon alternating dollops for a more rustic but equally beautiful effect.
Freeze the container for 4–6 hours, until the mixture is firm enough to scoop but still has that soft-serve consistency.
Step 4: Decorate the Cones
Melt white chocolate or candy melts in a small bowl. Dip the top rim of each cone into the chocolate, then immediately dip into rainbow sprinkles. Let them set at room temperature for at least 5 minutes.
Step 5: Serve
Pipe or scoop the swirled soft serve into the decorated cones. Garnish with extra sprinkles, whipped cream, or a drizzle of strawberry sauce if you like. Serve immediately and enjoy.
What to Serve with Strawberry Swirl Cones
These cones are amazing on their own, but here are some pairing ideas:
- Fresh fruit skewers for a light, summery dessert board
- Lemonade or iced tea to wash it all down with something refreshing
- Mini meringues or shortbread cookies on the side
- Chocolate drizzle or crushed pretzels for a sweet-and-salty topping twist
Tips for Making the Perfect Cones
- Whip the cream only to soft peaks. This gives the finished ice cream its cloud-like texture. Over-whipping leads to dense, butter-like cream.
- Chill both mixtures before swirling. This keeps the layers defined and easier to pipe.
- Use good-quality cones. They’re the base of your presentation and texture.
- For sharp swirl patterns, use two piping bags fitted into one larger one. This keeps the colors distinct.
- Serve within 4–6 hours for that ideal soft-serve texture. After that, it starts to harden into a more traditional ice cream.
Storage Instructions
Store the swirled ice cream in an airtight, freezer-safe container. Press plastic wrap directly against the surface to prevent ice crystals from forming. It’s best enjoyed within 3–5 days.
Prepared cones (chocolate + sprinkle rimmed) can be made ahead and stored at room temperature in an airtight container for up to a week.

Frequently Asked Questions
Can I use frozen strawberries?
Yes, just make sure to thaw and drain them first to avoid excess liquid. Simmer as directed to concentrate flavor.
Can I skip the piping step?
Absolutely. Swirling with a spoon may not be as precise, but the taste and color contrast will still shine.
What if I want a more intense strawberry flavor?
Add a teaspoon of strawberry extract to the base, or reduce the purée on the stovetop longer to concentrate the flavor.
Can I make this recipe ahead?
Yes! You can make and freeze the soft serve mixture up to 3 days in advance. Decorated cones can also be prepped ahead and kept airtight.
How do I get a clean swirl?
The dual piping bag trick works best. Alternatively, use a large spoon to alternate scoops when layering into the freezer container.
Is this recipe vegan-friendly?
Not by default, but it can be adapted. Use whipped coconut cream and a vegan condensed milk substitute. The texture may be a bit softer but still delicious.
More Recipes You’ll Love
If fruity, creamy, no-churn delights are your kind of dessert, don’t stop at just strawberries. Try these next:
- Mango Strawberry Ice Cream (No-Churn) – A tropical twist with a similar dreamy texture and bright color.
- Starburst Ice Cream (No-Churn) – A candy-inspired scoop that’s bursting with bold fruit flavor.
- Boston Cream Pie Ice Cream (No-Churn) – If you’re craving something more decadent but equally easy, this one delivers with custard and chocolate in every bite.
Don’t Forget to Share
Tried this recipe? I’d love to hear how it went. Leave a review below and share your cone creations on Pinterest. Seeing your takes on these recipes is the highlight of my week, and your feedback helps other readers too!
Nutritional Information (Approximate Per Serving)
Calories: 285
Fat: 19g
Carbohydrates: 26g
Sugars: 21g
Protein: 3g
Homemade Strawberry Swirl Cone
Description
This Homemade Strawberry Swirl Cone is a no-churn summer dream—fluffy strawberry and vanilla soft serve swirled together and served in sprinkle-crusted waffle cones. Made with real fruit and no ice cream maker needed, it’s as easy as it is beautiful. Perfect for sunny days, parties, or just a little kitchen fun!
Ingredients
Strawberry Soft Serve Base:
1 cup fresh strawberries, hulled and chopped
1 tablespoon lemon juice
2 tablespoons sugar
1 cup heavy whipping cream
½ cup sweetened condensed milk
½ teaspoon vanilla extract
(Optional) 1–2 drops pink food coloring
Vanilla Base:
1 cup heavy whipping cream
½ cup sweetened condensed milk
½ teaspoon vanilla extract
For the Cones:
6 waffle cones
2 tablespoons white chocolate or candy melts, melted
Rainbow sprinkles (for rimming)
Instructions
Cook the Strawberries: In a saucepan over medium heat, simmer strawberries, lemon juice, and sugar for 5–7 minutes until soft and syrupy. Let cool slightly, then purée until smooth.
Make Strawberry Base: Whip 1 cup heavy cream to soft peaks. Gently fold in the condensed milk, vanilla, and cooled strawberry purée. Add food coloring if using. Chill for 30–60 minutes.
Make Vanilla Base: In a separate bowl, whip another 1 cup of cream to soft peaks. Fold in condensed milk and vanilla extract. Chill separately.
Create the Swirl: Spoon each base into separate piping bags. Place both inside a larger piping bag or zip-top bag. Pipe into a freezer-safe container in a swirling motion. Freeze for 4–6 hours until soft-serve consistency.
Decorate Cones: Dip the tops of each waffle cone into melted white chocolate, then immediately into sprinkles. Let set for 5 minutes.
Serve: Scoop or pipe swirled soft serve into decorated cones. Add more sprinkles, whipped cream, or strawberry drizzle if desired!
Notes
For the best swirl, chill both ice cream bases before piping.
Frozen strawberries work great—just thaw and drain them first.
Don’t over-whip the cream; soft peaks give that perfect airy texture.
Want more fruit flavor? Add a little strawberry extract to the purée.
Store leftover ice cream in an airtight container with plastic wrap pressed on the surface. Enjoy within 3–5 days.
Decorated cones can be made in advance and stored at room temperature in an airtight container for up to a week.